
After taking it all apart and cleaning everything, rebuilding it was fun. I rebuilt this chassis as a Madcap because I wanted to see the Madcap body and wing styling, which seemed more appealing than the Saint Dragon body styling. The leftover parts trees from the first Saint Dragon chassis I restored had the Madcap rear wing mount pieces I needed so I ordered a reproduction Madcap body and wing from Team Bluegroove in Canada. I also purchased a steering rod that was missing.
The original red friction shocks were painted metallic red by the previous owner.

Since the plan was to use the vehicle as a runner, I upgraded the friction shocks to the Tamiya black CVA mini (50519) and short (50520) oil dampers.

This is the finished chassis after rebuilding. The wheels and tires are made by Carson in the UK and are nice for asphalt driving.
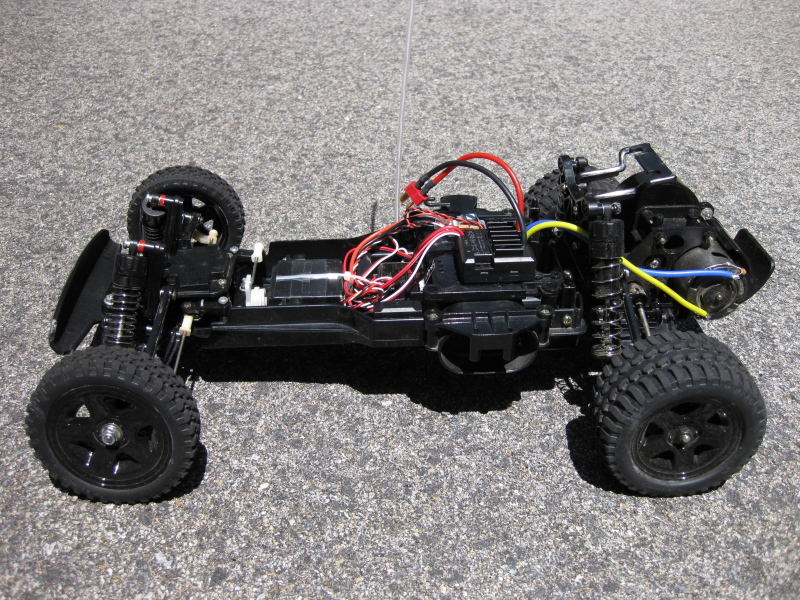


Notice the clipped front bumper. I think the previous owner used larger diameter wheels and tires and needed to trim the bumper so the tires wouldn't rub on full steering lock.

For radio and electronic gear, I used a Futaba R113ip receiver with Novak 3 Amp BEC (#5460), Tamiya TEU-104BK ESC with an old Mabuchi RS540S motor, and an old Futaba S28 servo for steering.
Although the chassis tub itself was quite well used and cracked in spots, I decided not to replace it. They are quite expensive anyway. I used some CA glue to hold a cracked front post together. I think Tamiya engineered the front posts too thin on this chassis. Even on a new tub it is easy to split and crack the post as you screw in the top brace.
 |
| The CA glue is already cracking. Maybe it's time to use epoxy instead. |
The bottom front part of the tub is also cracked around the screw holes, but it should hold together as long as I don't jump it much. I plan on driving it mostly on asphalt anyway.

The rear of the chassis tub is in good shape.

I left the drivetrain stock this time rather than upgrade to the Thorp 48P gear system like I did for the Saint Dragon. This chassis didn't come with a motor or pinion, so I found an old Mabuchi RS540S and cleaned it up a little and then found a 23T pinion with the correct pitch in my pit box. The motor brushes are very worn, but it still has a lot of life left.
Here is the Team Bluegroove body and wing after trimming and painting in box art colors. I used Tamiya PS-2 Red (86002) on the wing and PS-5 Black (86005) plus PS-1 White (86001) on the body.

I was lucky to get my hands on a set of original Tamiya Madcap decals from TamiyaClub member 'toybaron'. Thanks Ron!

And here the body and wing are resting on the chassis before applying the decals. Note that the wing is just balanced on the wing mount, not screwed, so its positioning is slightly off.


And finally, the finished vehicle with decals applied:


Getting all of the decals to line up on either side is difficult, so there are some slight alignment and spacing issues, but overall not too bad. This is supposed to be a runner, after all, not a shelf queen. I used soapy water to make it easier to position the decals. Of the three tinted cockpit window decals, the top one was the most difficult to apply. It is slightly wider than the top part of the window so the edges of the decal buckle due to the complex curve. No amount of heat from a hair dryer or pressure from a toothpick or fingers could overcome the bubbling. I may strategically cut the edges using an X-Acto knife to get the decal to lay down flat. If I do nothing, the edges will fill with dust and dirt and make the decal ultimately fail.
I have to say that I love this chassis and the low profile body style of the Madcap. Even though the front end chassis design is a bit weak because of those thin mounting posts I mentioned earlier, it's a fun car to drive and it handles fairly well. This may seem a bit odd to say, but the sound of the motor and gearbox at full speed going up the driveway is really pleasant to listen to on this vehicle. It just hums along like a fine-tuned machine - very different from some other vehicles in my fleet.
I really hope Tamiya re-releases the Madcap / Saint Dragon chassis in the near future. The Astute was the higher-end racing version of this chassis and I hope Tamiya plans on re-releasing that as well. These vehicles definitely deserve to be re-released. "Never Give Up" hope!
No comments:
Post a Comment