Monday, June 24, 2013

Tamiya Super Fighter GR Built and Finished

Back in 2011 I purchased a Tamiya Super Fighter GR kit (58485) and posted about it here.  I built the chassis in 2012 but left the body alone until a few weeks ago.  This car is a runner and basher based on the DT-02 chassis.  It's definitely a beginner's vehicle but a lot of fun to drive.  Spare parts are very plentiful because of the popularity of the chassis so there is no worry about breaking a part that cannot be replaced.  

I upgraded the bearings and motor on this car in order to give it some more speed, but I left the stock yellow friction shocks.  For radio gear, I used a Futaba R113ip receiver, Futaba MC330CR electronic speed control and Futaba S148 servo for steering.


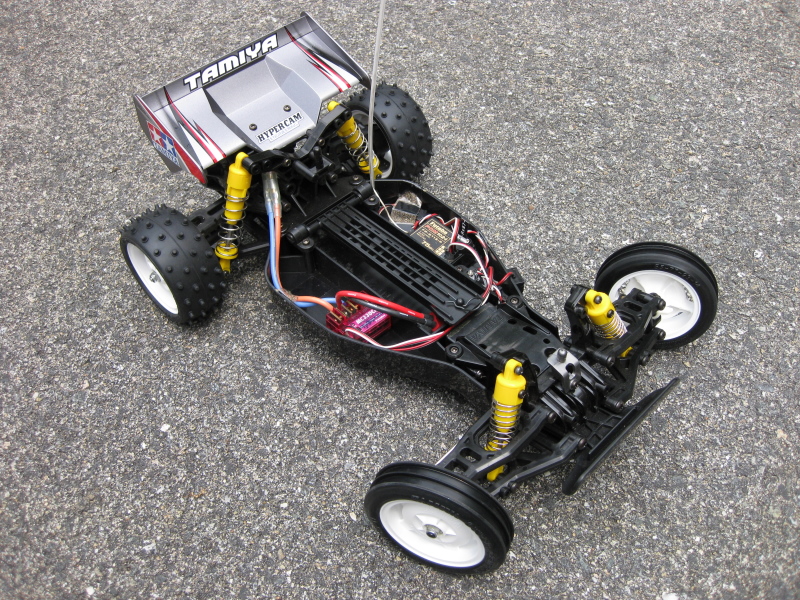
The motor was upgraded from the stock Mabuchi RS540S to an Epic Paradox unlabeled 27T stock.  Unfortunately the gearbox has an almost enclosed motor housing so cooling is an issue.  On hot days, the motor gets really warm after only a short run.


At first I wasn't even going to paint the gray molded hard body before applying the decals. But after learning that the main body box art paint color was Tamiya TS-42 Light Gun Metal (85042), which has metal flake, I had to paint it up first.  I'm very glad I did.  It looks a lot better painted than the raw gray molded plastic.  The exhaust tips are painted with Tamiya TS-21 Gold (85021).  


The decals:


The soapy water trick worked very well for the application of the decals due to their size and shape, however the complex curves on the body made it almost impossible to get the decals to stay flat and not bubble up in some spots.  Compound curves are not fun to cover with a flat decal.  A hair dryer on medium heat and a toothpick worked well to get the exhaust tip decals to wrap around the gold painted cylinders and stay there.

I really like the color and decal styling on this buggy.  It's kind of futuristic but with an aggressive body style and sharp decal lines.


And here is the car with Carson wheels and tires designed for the street that I use for general running:


This was a great car to build (very quick assembly) and paint.  If you are just starting out in the hobby, don't want an RTR (Ready To Run), and would rather assemble a car from a kit, then any of the Tamiya DT-02 chassis based vehicles is a good place to start.  Some other DT-02 based chassis vehicles include the Sand Viper (58374), Holiday Buggy 2010 (blue body) (58470), Holiday Buggy 2010 (red body) (84212 (limited edition)), Sand Rover 2011 (58500), Super Fighter GR Violet (58536), and many more.

Monday, June 17, 2013

Kyosho Raider Restoration (part 2)

Reassembling the Kyosho Raider using the instruction manual was an easy task.  The kit was designed for beginners, so the assembly steps were not complicated at all.  As usual, I replaced all of the bushings with ball bearings.  I used a Futaba R113ip receiver with Novak 3 Amp BEC (#5460), Tamiya TEU-104BK electronic speed control with original Kyosho Le Mans Stock 05 motor and a Futaba S148 servo for steering.

The wheels and tires in these pictures are old Kyosho/Duratrax street tread because I wanted to drive the chassis around for a bit in order to test it out.  I didn't want to use the original wheels and tires because they were still disassembled while I decided how to whiten the wheels which have yellowed with age and UV exposure. 

It's interesting that the battery tray molded into the main chassis is offset to the right in order to compensate for the weight of the motor hanging off the left side. 


The shocks are friction type, not oil filled, which is typical of beginner-class vehicles. 


The steering geometry in the Raider has some quite severe bump steer traits which is also typical of less expensive beginner class vehicles.  Lifting the front end causes very severe toe-in of the front wheels.  In the shot below, the front suspension arms are just above level.  This height is close to where the front end settles during normal driving so I tried to adjust the steering tie rods so toe-in is minimal at this position.  Having some toe-in is normal and desirable in most off road buggies.  Continuing to push down on the front end results in some toe-out, so it is a delicate operation to try to find the right length for the tie rods that allows the front end to perform steering duty without wearing out the tires too quickly or causing strange steering behavior while driving.


The raised mounting position of the steering servo is also very interesting.  This position raises the center of gravity of the vehicle - generally not a good thing in an off-road buggy where stability is important.  


The Le Mans Stock 05 motor cleaned up very well with some motor spray.  The brushes are still in good shape.


The access panel on the side of the gearbox (just behind the antenna tube in the below picture) is for gaining access to the motor mounting screws, inspecting and greasing the pinion and spur and setting the proper mesh.
 

Actually, this access panel came in quite handy.  During the first maiden test run after the rebuild was completed I noticed that the gearbox sounded very noisy.  It sounded like one of the gears was not round or the gear mesh was too tight and then not as tight as a gear turned, sort of like a pulsing grinding noise.  After removing the access panel from the side of the gearbox and looking at the gear mesh between the pinion and spur, I discovered that the pinion gear had a manufacturing defect.  The motor shaft hole was not drilled in the exact center of the pinion, so the gear wobbled as the motor shaft spun it around.  This caused the gear mesh to be too tight against the spur in one spot and too loose 180° in the rotation later.  I replaced it with a Robinson Racing steel 14T 32dp pinion I had in my pit box and test drove the car again.  The gear noise sounded completely normal and smooth.

During the test drives on asphalt, the Raider felt slow compared to other beginner vehicles except maybe the Tamiya RS380-powered Grasshopper.  The Raider has lots of power, but no top end speed.  The Le Mans Stock 05 motor is comparable to the Mabuchi RS540S in terms of basic performance, so I was a little surprised how slow the vehicle was in stock form.  Some of the slow speed could be attributed to the wheels/tires used in testing.  The outside diameter of the tires is slightly smaller than the stock tires.  According to the manual, an optional 15T pinion can be used, but that's all it mentions.  The gearbox motor mount has two sets of holes, one for the 14T pinion (holes A and D) and the other for the 15T pinion (holes B and F).  Although there is a slot in one of the motor mount holes used for the 15T pinion that could possibly give more pinion choices, the manual doesn't mention using it.  Going up one tooth isn't going to make a huge difference in speed.  Going to a faster motor would also help, of course, but for now I will keep the Le Mans Stock 05.


I purchased a reproduction body and wing from Team Bluegroove in Canada.  The wing is actually molded behind the rear of the body instead of being a separate part, so some care has to be taken when trimming both parts.
 

Now that the chassis is complete and operational, all that is left to do is paint and decal the body and wing.

Monday, June 10, 2013

Kyosho Raider Restoration (part 1)

After having restored a vintage Kyosho Pegasus near the end of the summer season last year, I decided to check out the original Kyosho Raider (3184). 


I decided that I wanted a runner, not a shelfer, so I wasn't looking for something in perfect condition.  Eventually I bid and won this nicely used model.  These pictures are from the original auction:
 

It came with an old Futaba Attack 2-stick radio system, NiCd 6 cell stick battery of unknown capacity, the original box and some of the leftover parts trees and other items from the original build.  Unfortunately it did not come with a body or wing, but the original decals were included with only a thin strip of clear decal missing.  The missing strip of decal was used to hold the receiver to the rubber band that was holding the receiver to the chassis per step 22 in the instruction manual and does not affect the rest of the decals on the sheet.  The original builder appeared to have followed the manual quite closely.

Once I received the chassis, I took some more pictures before disassembling everything.  The chassis was dusty and it was obvious that the buggy was used, but definitely not abused.  No parts were broken or missing except for the body and wing.


The stock Le Mans 05 motor was included and in great condition.

In the next picture you can see the yellowed wheels.  It seems to be very common to find Raiders with white wheels that turned yellow over time due to UV exposure.  I think I will try to whiten the wheels, but I'm not sure if I want to try putting the wheels in a bowl full of hydrogen peroxide left out in the sun, or just spray paint the wheels white.  I've read about bad experiences some people have had using hydrogen peroxide to whiten wheels so I am hesitant to try it.


After taking the chassis apart, I snapped a picture of the major plastic chassis components before cleaning:


All of the metal parts were thoroughly cleaned in motor cleaner to remove all old oil, grease, dirt and other gunk.  Here is a shot of the cleaned metal parts ready for reassembly:


All of the gears were in excellent condition and no cracks or stress marks were found in any of the plastic chassis parts.  The dogbones and drive cups were not worn, so I did not need to replace anything.

Here are some box side panel shots:


The next step is to follow the original instruction manual in order to rebuild the chassis.  After that, I will need to get a reproduction body and wing.