Monday, February 13, 2012

Plazmost Polycarbonate RC Vehicle Stands


For many years now, French eBay seller "plazmost" has been manufacturing and selling high-end stands for a select few radio control chassis, including:
  • HPI Baja 5B
  • HPI Savage
  • Kyosho Optima/Javelin/Salute series
  • Tamiya Bruiser/Mountaineer
  • Tamiya High-Lift series
  • Tamiya SRB series (Sand Scorcher, Rough Rider, Buggy Champ, Super Champ)

If you are wondering why stands are necessary, the rubber tires on most RC vehicles can develop a flat spot over time and even start cracking, much like a 1:1 car, if they sit in one spot for long periods of time.  Shelf queens (models built for display only) are especially prone to this sort of deterioration.  The stand keeps the tires from touching the ground, so they stay round.

I bought Plazmost stands for my Mountaineer and Toyota High-Lift a few years ago and really liked the look and design.  The stands are CNC machined out of one-eighth inch (3.14mm) clear polycarbonate sheet, and some sections are shaped to conform to the underside of the chassis so the fit is secure.  Then Plazmost applies custom manufacturer-specific metallic decals to the sides to give the stands a professional appearance.  They aren't cheap, but they are strong and look fantastic.

More recently, I bought some custom-made Kyosho stands from another eBay seller that were made by Plazmost.  I wanted more of these, plus I wanted a bunch of the same design but with the Tamiya decal instead of Kyosho.   The point of these custom stands was to make them more generic in terms of the chassis it could hold, rather than designed to fit a specific chassis only.  The top of the stand that contacts the chassis is flat rather than shaped.  I also wanted a lot of them, so I was hoping to reduce the price of each stand by making them simpler in design.

So, I contacted Plazmost in January to see if he would make some custom stands for me.  We agreed on a design for the Tamiya stands and the final price for the complete order, and then he went to work (on a Sunday, no less!) and finished my order that day to be shipped early in the week.  About a week after that, they arrived in the mail.  Amazing speed and service!

Here is the result.  This picture only shows part of what I ordered.
As packaged from Plazmost, each piece is separated to prevent scratches during shipping from France

Clear pieces make it difficult to take a picture

Alternate surface and lighting

Unlike Plazmost's regular stands, it is possible for the vehicle to slip off the stand since it is flat where it supports the chassis, but on a level surface like a table or shelf these work just fine.  With some thin rubber or soft plastic trim mounted on the top edges it would be possible to make the stand more non-slip, too.

Assembled

Close-up of the Tamiya decal.  One star is silver, the other is gold, as is the name.

Close-up of the silver Kyosho decal

Kyosho stand with Turbo Ultima

Tamiya stand with Buggy Champ

Close-up shot of Tamiya stand with Buggy Champ


I know these pictures aren't great because they were taken indoors using a flash; the true colors do not come out very well.  But these stands definitely look a lot better than paint spray can lids!

Plazmost did a fabulous job making these custom stands.  Thanks Aki!

You can see the regular stands at his eBay store here:  Plazmost Store
He may decide to offer these custom stands as regular items at his eBay store in the future, or you can contact him through eBay messaging if you want some made.


Monday, February 6, 2012

Kyosho Pegasus Restoration (part 1)

The Kyosho Pegasus is a very low-end car that was designed to compete with the Tamiya Grasshopper and Hornet back in the 1980's.  It has friction shocks and suspension arms that pivot by the bending of plastic instead of a hinge pin design that is normally found on off-road vehicles.  You don't see a lot of them around today, probably because they got broken after heavy use.

I can remember looking at the Tower Hobbies catalogs when I was young, wishing that I could get the Pegasus, or maybe the Icarus, which was based on the same basic chassis.  I had no idea how the cars were designed or how well they performed back then.  I was simply intrigued by the overall look.  Before I got this example, I still had no idea how the chassis was built until I actually got my hands on it and looked at the manual.

Here are the three original auction pictures of the car:


The seller described it as assembled, but never run, and in outstanding condition.  As it turned out, nobody else bid so I won by default.  

Once I received the car, it was very clear that it had never been used.  All of the plastic parts were new and most of them still had the mold flashing on them.  Whoever put this together didn't trim anything.  Not only that, but almost all of the screws were only 80% screwed in to the parts.  Very odd.  It was like someone rushed to build it just enough to have a rolling chassis, but stopped once it was together and resembled a finished chassis. 

All was not perfect, however, as there were a few parts missing that I couldn't tell from the auction photos such as the steering servo mounts, steering tie rods and ball connectors, servo saver, and the lights that mount on the body.  The wing was missing, too, but I knew that before I bid.  The tires were in decent, but not perfect condition.  Due to the car sitting on a shelf for years, the rear tires developed flat spots.  The rubber was still pliable and not cracked however, so I was able to put some foam in the rear tires to help push the flat spots out.  Overall I was pleased with the purchase.

I took the car apart all the way down to the individual screws and parts, which was very easy to do because none of the screws were tight.  Since the parts were new, I did not have to clean them like I usually do when I get a chassis to restore.  After trimming the flashing from the plastic pieces using a hobby knife, I started the assembly using the manual as a guide.  All plastic bushings were replaced with ball bearings. The build was very easy, which was to be expected since this was a beginner's kit.  I had to skip steps that required the missing parts, but there wasn't a whole lot to it.

I managed to find a steering rod spare parts package rather quickly, but the steering servo mounts were more difficult to find.  Well, actually they were easy to find, but part of a much larger plastic parts tree that was priced higher than I wanted to pay.  I kept waiting and finally found a really trashed Pegasus chassis that was missing a lot of parts, but had the servo mounts I needed:
I bet this has a story to tell

It came with these loose parts, too:

I probably paid too much for it, but still less than the PI-3 parts tree that contains the steering mounts. I got some spare parts in the process, too, including gears, rear dogbones and drive cups that were still in useable condition.  The steering  joints in the above photo look like they are from a Kyosho Optima, so they have nothing to do with the Pegasus chassis.  I guess the seller just happened to have them stored with it.  The rear axles were garbage because they were so worn down from using bushings, and the arms were junk because they were ripped apart for who-knows-what-purpose.  But the servo mounts were there, and in perfect condition.  I cleaned them up and finished installing the steering servo.

Lastly, I picked up a reproduction wing from TeamBlueGroove on eBay since the original was missing.

I had one rather bad mishap during the assembly:

I broke a rear axle when it rolled off the workbench and fell onto the concrete floor of my basement.  It hit the floor just right and broke at the weakest point where the threads end and the smooth part of the shaft starts.  If it had hit the floor with the big cup part on the opposite end, it probably would have been perfectly fine.  After some choice words to myself, I had to start the search for some replacement axles.  Thankfully, I found some more brand new ones, and for not too much money.  Now I have spares, too, in case another one breaks.

I decided to keep the stock motor since I wanted to use a vintage Futaba MC112B electronic speed control that I had stored away.  I fitted the radio components and hooked everything up.  Using the Gelly Roll paint pen from Sakura, I painted the white lettering on the tires.  The chassis is now complete.

All that is left now is to paint and decal the body and wing once the weather warms up.

Monday, January 30, 2012

Tamiya DB-01R

The Tamiya DB-01 chassis has been around for a few years and is a very good competitive off-road buggy platform from Tamiya.  I do not race competitively, but I enjoy building Tamiya off-road kits, so with the imminent release of the DB-02 chassis in a few weeks the end of the DB-01 chassis production will come sooner or later.  I decided to get a DB-01 chassis kit before they were discontinued and the price goes up.  There are many kits based on the DB-01 platform, but I decided to stay in the middle of the price spectrum and get the DB-01R (84100) limited edition kit.  I bought this kit for a really great price which was another deciding factor on which kit to buy. 

The kit box is a bit smaller than the standard Tamiya kits
Yes, that is a carrying handle!

The DB-01R is designed for competitive racing and includes many of the hop-up parts racers would end up buying in order to get better performance if they bought a lower-end kit like the Baldre or Durga.  

Some of the chassis and suspension components are made out of a carbon fiber reinforced plastic instead of plain non-reinforced plastic or glass-filled plastic in order to make them stiffer.  Upgraded shocks are included, as well as other anodized aluminum parts including suspension mounts and motor heat sink, plus front and rear universal shafts and a slipper clutch.  The list of included hop-up parts is enough to tilt the scales and say that the DB-01R has the best bang for the buck overall when compared with the other DB-01 kits like the Baldre, Durga and limited edition TRF511.  The Baldre and Durga are designed for sport-level racing and bashing around, while the TRF511 is for high-end competition, so the DB-01R sits right in the middle.
 
The DB-01 chassis is a mid-motor design with two equal-length belts driving the front and rear wheels.  The slipper clutch with front and rear ball differentials work to transmit power to the ground.  The gears are 48P to keep in line with the standard used by other manufacturers.

When you open the box, you are greeted by... not a whole lot, actually.  There are no fancy blister packs here, and in fact there are no cardboard dividers or mini cardboard boxes of parts, either. There is one large plastic bag that contains many smaller plastic bags full of parts, plus the molded plastic trees, the belts, and the main chassis.
The box isn't really that full
The first thing that jumps out at you is the lack of a body, wing, wheels, tires, motor and pinion.   That's right, all of those parts are not included in the DB-01R kit.  Being for the racer, these components were left out on purpose since each person wants to use slightly different components.

Reviewing what is included in the box, here is the slipper clutch, some shock tops, bottoms and pistons, the main slipper spur gear, reinforced drive belts and hi-torque servo saver parts tree (same as 51000).

Looking further into the large plastic bag of bags, we see some more miscellaneous parts in bag B, including some blue anodized suspension mounts and more.  Parts bag C includes the anodized aluminum TRF damper shock bodies and other parts.  A couple more small plastic parts trees are also shown here and round out the contents of the large plastic bag.

Looking at the rest of the kit contents, there are some more plastic parts trees individually wrapped in plastic bags.

The main chassis and suspension arms. 

And finally, the manual and DB-01R-specific decals.


That's it for the main DB-01R kit.  It may seem kind of cheap to not include basic things like the body, wheels, tires and motor, but you have to remember this is a true competition kit, designed for the racer that already knows what they want to use for their particular track situation and driving style.


Now for the additional parts and extras (hop-ups!).

Since a buggy is useless without wheels and tires, I bought some Tamiya branded ones (51320, 51321, 54185, 54186).


Reading the various forums on the net, it was pretty clear that the most-recommended body kit is the Baldre (51338).  The body kit comes with the main body, wing and decals.


Then, because I am never one to leave good enough alone, I got a bunch of spare parts and hop-ups.  I bought a couple gear differential sets (54329) in case I want to swap the included ball diffs to see how it handles.  I'll be using a Tamiya Super Stock TZ 23 turn motor (53696) plus Tamiya steel 48P pinion gears (54062, 53964, 53966).  I'm not sure what size pinion to use, so I got a few sizes to try out.  Then I got the aluminum steering components (54149, 53972), the anodized motor mount (54079), and the TRF501 stabilizer set (53963) for fun.  Spare parts include a slipper pad set (54027), reinforced drive belt (54140), and an extra set of front and rear suspension arms (54140, 54141) not pictured.


I still have a few more hop-ups arriving, including a couple sets of Tamiya TRF501X differential joints (51286) and a package of Tamiya Ball Differential Protective Seals (53970).  These were recommended because the stock diff joints are assembled metal and plastic two piece units that are prone to failure and the seals help keep dirt out of the ball diffs so they stay nice and smooth.  

This will be a really fun build!

Monday, January 23, 2012

Tamiya Avante 2011

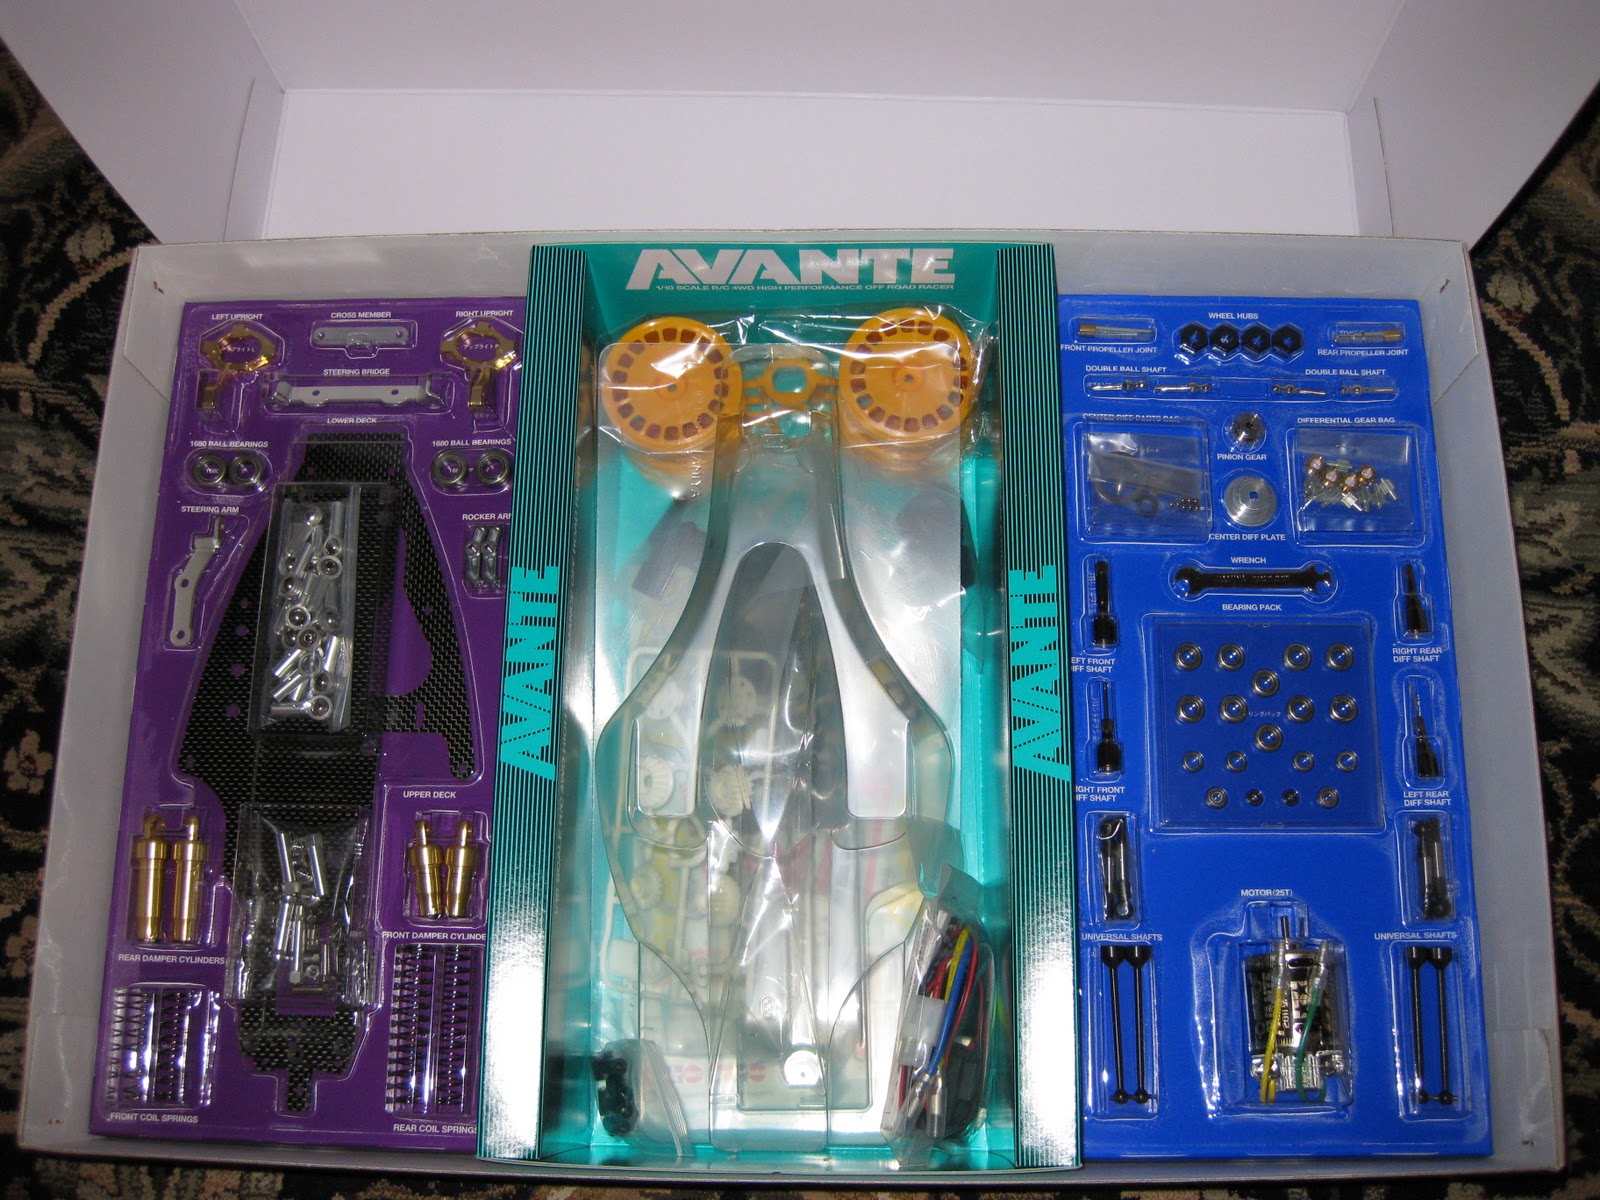
Tamiya re-released the Avante in 2011, once again surprising the Tamiya community.  The Avante 2011 (58489) is a modernized version of the original Avante (58072).  Major chassis components and design are the same as the original, but some parts were upgraded and strengthened.  For example, the upper and lower chassis plates are made out of carbon fiber instead of fiberglass, and the front uprights are made from machined and anodized aluminum instead of cast metal.  There are many other changes as well, including universal joints in front and rear, updated shock design and modernized wheel hubs.
Box top

Inside the box, showing the manual

Blister packs and polycarbonate body

The specially-labeled 25 turn Avante 2011 GT Tuned motor
Under the blister packs

More box art diagrams


TEU-104BK ESC, plus hop-up parts from Pargu2000 and rc_loverr
Yes, I could not help but buy some alloy hop-up parts for my Avante.  These parts from Pargu2000 and rc_loverr on eBay replace the stock E1, E2, C1, C2, and C3 plastic parts with aluminum.  Another eBay seller, cty300, sells alloy Avante parts as well, and they are a bit more detailed in design than the ones by Pargu2000.  Pargu's are more "chunky" while cty's are "elegant".

Bonus 2.2" wheels

The decals are not the same as the originals


An incredible car, and amazing that Tamiya re-released it!

Friday, January 20, 2012

Updated layout

I got bored with the default layout, so I made it wider, added some color, and created some new lists on the right side of the page.  I think it looks better than grayscale, don't you?

Monday, January 16, 2012

Tamiya Saint Dragon Restoration (part 1)

I found this on eBay.   Here is how it looked when I got it and removed the wheels.

It is a Tamiya Saint Dragon (58083).  It has the same chassis as the Tamiya Madcap (58082) and shares a lot of components with the Nissan King Cab (58081) and Toyota HiLux (58086).  The chassis is actually based on the Tamiya Astute (58080), but much more low end.  Still, it has a good gearbox design and accepted many of the Astute hop-up parts, which we'll see later.  I do not believe it was a very popular model, as the body style was very polarizing.  The Madcap was much more popular here in the US since it was a traditional 2WD buggy.  Here is the box top picture from the original auction to show what I mean.  The body was based on a Japanese manga comic.


This was "new built" which means it was put together but never ran, according to the seller.  When I got it, it was obvious that it was never run, however the previous owner had made some major changes to the front suspension arms in order to fit some longer shocks.   They had also used some interesting parts to act as wheel bearings.  Basically, one front wheel had "bearings" made from a hex-shaped nut with no threads and the other front wheel had a Tamiya plastic bearing and a 5x10mm Kyosho bearing which was too small (Tamiya bearings are 5x11mm).  Quite odd.

The front shocks were sort of a hybrid between the stock friction bodies and longer shock shafts to reach out to the ends of the arms.  A hinge pin made out of another shock shaft was used on both front arms to mount the shocks and the hub carrier.

The front suspension arms were cut in order to make room for the longer shocks, which effectively ruined the arms and prevented their use in the restoration.

In the back, black oil shocks were mounted instead of the stock red friction shocks.
The wheels and tires are brand new.  Rear tires are still available from Tamiya, however the front tires are hard to find.  I am lucky to have these in perfect condition.

The ball diff was extremely tight and did not feel good at all.  After taking it apart and cleaning all of the parts, I discovered the cause of the tightness.

This ball race was deformed, probably from heat.  I'm not sure exactly how it happened since the car has never been run, but most likely someone held one rear wheel while the other spun under power from the motor, and the friction inside the ball diff melted the race.
I wasn't planning on using the stock gearing anyway, so I didn't care much about it.
The body is actually in good shape.  It is untrimmed, and has damage to some parts, but none of the damage is located on the body itself, just the pieces that will get cut off.  Very lucky!  The decals, however, were wrinkled, bent, punched-through, and not really in good enough shape to be useable, so I bought a new set.  I also bought a new set of front suspension arms, a rear shock X parts tree to replace some missing rear shock parts, the rod bag to replace some missing shock springs, the hinge pin bag to place missing shock shafts and the front outer hinge pins, some missing screws, and some hop-up parts.
Starting from the top and going clockwise, the Madcap motor plate (53060) will be used to replace the stock plastic motor plate (amazing that Tamiya designed a plastic motor plate - talk about cheap!), a Thorp King Cab/Astute 48P ball diff (4975), a Thorp 48P conversion kit for the King Cab/Astute (4980), and finally a set of Astute universal joints (53061).  There was nothing wrong with the stock gears or drivetrain components, but I wanted to make this a bit better than stock.
I also got a set of front (50519) and rear (50520) CVA oil shocks in order to provide better performance than the stock red friction shocks.

For the restoration, I'm going to completely disassemble this chassis down to the individual screws and parts, give everything a thorough cleaning, and then build from the manual like new, but using the hop-up parts shown above, plus full ball bearings, a Tamiya TEU-104BK electronic speed control, and an Epic Paradox 27T motor with a 19T 48P pinion.  For now, I'll use the stock red shocks in order to give it the box art look, and when I run it I'll switch over to the CVA oil shocks.
I am planning on painting this box art, so the body will be all white with the stock decals.  I may also get a reproduction Madcap body and wing in order to have an alternative body style, but I'm not really sure about that just yet.

Monday, January 2, 2012

Rogue Element Components SRB Gear/Motor Cover

I got a set of these alloy gear/motor covers recently.  
The packaged kit

Chris Cazan, owner of Rogue Element Components, offered these for sale only to subscribers of his email list back in the beginning of November 2011.  
Sand Scorcher (SRB) Gear/Motor cover kit contents
These parts were so unique and cool looking that I had to get a set.  I'm not one for chrome or bling usually, but these parts seemed to offer a classy upgrade to the bland stock clear gear and motor covers that come with the SRB kits.

I installed these parts on a shelfer Super Champ that is not quite finished.  It took a bit of cutting and sanding in order to fit the clear lexan window into the gear cover, but the fit is tight enough to not require epoxy, especially for a shelfer.  I decided to leave the finish as-is, which means all of the tool marks and rough spots are the same as I got them from Chris.  The only thing I think needs a bit of work is the motor cover.  There are two issues with it:
  • It does not account for the electrical tabs that exit the rear of the motor, forcing you to bend the tabs outward, and even then both tabs touch the cover which would result in a dead short if power were applied to the motor.  It is possible to cover one or both tabs with heat shrink tubing, but the fit is very tight and I would be concerned about the cover cutting into the heat shrink insulation due to vibration over time.  If Chris made a small cutout in the motor cover or altered the design of the three spokes so the width was reduced, even just 1 or 2mm, it would have made all of the difference.
Both tabs are bent outward, but are still touching the cover

 The stock RS540 and Tamiya Sport Tuned (black) motors have plastic insulation surrounding the electrical tabs that exit the back of the motor.  This insulation isolates the tabs from the rear metal motor endbell to prevent shorts.  The insulation also sticks out of the back of the motor about 1mm to 2mm and the motor cover spokes hit the insulation, meaning that the cover cannot fully seat over the rear of the motor.  The insulation acts as two high points that allow the cover to rock back and forth.  Since the cover cannot get closer to the back of the motor, there is a gap between the cover and the gearbox on all 3 screws.
The insulation is black in color, surrounding the motor tab

Given the amount of detail Chris dedicated to these parts, I'm a little surprised that he did not encounter these issues during fitting.  Still, even with these issues, these are amazing parts and quite unique.  For a shelf queen, the problems are minor and with some cutting they could even be eliminated. 

About Rogue Element Components
Rogue Element Components is a custom machine shop owned by Chris Cazan that produces extremely limited machined alloy and plastic parts for radio control models, including hop-up and accessory parts for Tamiya vehicles and rock crawlers of any type.  The items are built to order and Chris keeps no stock on hand, so if you don't order an item when he offers it for sale, you will probably never get another chance to buy it again.  On rare occasions an item will be offered more than once if it was popular or Chris receives enough queries asking for another manufacturing run. Chris will do custom one-off work as well.

If you have an interest in very unique and detailed parts for your radio control vehicle, sign up for his email list by visiting the Rogue Element Components web site linked above.  Every few weeks you'll get a new product announcement from Chris via email with details on what is being offered and how to pay a deposit or full amount.  The item(s) will arrive in the mail about a month after he starts manufacturing.

Disclaimer:  I am not affiliated with Rogue Element Components in any way.