Showing posts with label saint dragon. Show all posts

Monday, July 22, 2013

Tamiya Saint Dragon Restoration (part 2)

After almost a year and a half I finally finished restoring the Saint Dragon (58083).  The first installment of the restoration included evaluating the chassis, purchasing replacement parts where necessary and selecting some vintage hop-ups to use in the rebuild.

Because I subsequently purchased a runner Madcap chassis and just recently finished its restoration, I decided to keep the original red friction shocks on the Saint Dragon and make this rebuild more of a shelf queen.  The condition of this chassis is much nicer than the Madcap and I want to keep it that way.  The black C.V.A. shocks intended for this car went to the Madcap, however the other hop-ups, including the motor plate (53060), Thorp 48P gear set and Astute universal joints were used as I had planned. 

I followed the manual to ensure a proper rebuild, substituting hop-up parts where required.  Ball bearings replaced the plastic bushings, of course.

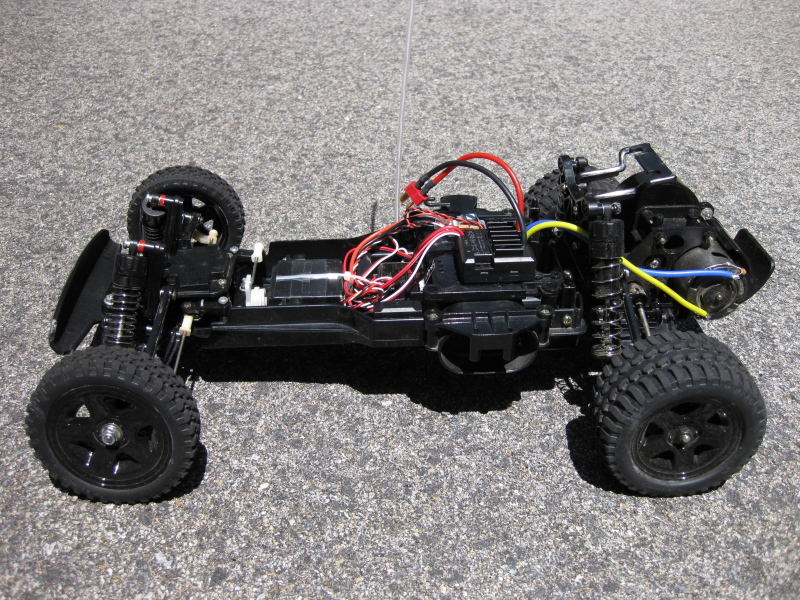
Here is the almost-finished chassis before the shocks and radio system were installed:


During the rebuild, the thin chassis front screw posts started to groan and slightly split, so I added some springs on the outside of the posts for reinforcement.  It helped prevent the posts from breaking further.  As I have mentioned before, these posts are one of the weakest parts of this otherwise excellent chassis.

Springs helped reinforce the weak screw posts

I used a Tamiya TEU-104BK electronic speed control with Novak 3 Amp BEC circuit (5460), Futaba R113ip receiver and Futaba S148 servo for radio gear.  The motor is an Epic Paradox 27T stock motor with 19T 48P pinion meshed to the vintage Thorp 48P gear and ball diff set. 


I have to admit I was a little bit nervous to trim the original vintage body.  I wasn't sure how brittle the plastic had become and did not want to cause an unwanted crack in the body during the trimming process.  There were already signs of stress fracturing in some parts of the body where some tight bends were located and the worst thing that could happen is for the plastic to split in those locations.

Before I started trimming the body, I decided to wash it completely using soapy water both inside and out.  Then I soaked the body in very hot water for approximately 15 minutes.  My hope was that the plastic would absorb some of the water and become slightly less brittle.  I know nylon parts can be boiled to restore their flexibility, so why not try a similar approach with polycarbonate?  I did not boil the body for fear of warping, but the water was hotter than I could handle with my hands.  I have no idea if the hot water soak helped at all, but the body did not split, crack or break during the trimming process.


Tamiya had already pre-drilled the body mount holes and the antenna hole, plus the rear vents and the inside part of the front shock cutouts were pre-cut which made trimming much easier and faster.  I used an X-Acto knife with a fresh #11 blade to do most of the trimming because it seemed to stress the body less than using lexan scissors.  Also, the body has some very deep and intricate inside corners which are extremely difficult to do with scissors.  I carefully scored a continuous line all the way around the body by following the molded-in cutout lines, then, using lexan scissors, cut the excess lexan at strategic corner points.  The scissor cuts were made in such a way that the lexan pieces could be bent along the score line and separated from the main body.  The resulting edges were amazingly smooth and as straight as the score line itself, so precision is more important than speed when scoring.  In all, it probably took about 3 hours to completely trim and sand the body.

Once trimming was finished I masked the cockpit window on the inside of the body and painted it using Tamiya PS-1 white polycarbonate spray paint (86001).  Finally, I applied a set of original Tamiya decals using the soapy water technique.


A couple decals (the gray/silver ones above the cockpit window) want to wrinkle even after completely drying and undergoing extensive heat treatment with a hair dryer and toothpick.  Not sure what can be done about that, but overall it still looks pretty good.

I remember seeing pictures of the Saint Dragon years ago and thinking how ugly the body styling looked.  As such, it was never on my list of vintage cars to buy.  But because this car was in such great condition, including the original, uncut body, I had to respect its history and properly make it into a complete Saint Dragon box art restoration.  After finishing the work, I have to say that I am glad I did.

Monday, July 1, 2013

Tamiya Madcap Built and Finished

This build wasn't really supposed to be much of anything because I was just looking for a cheap runner chassis.  I didn't even bother to take any pictures of the car as it looked from auction.  The chassis was originally a Tamiya Saint Dragon, but it is not the same one I posted about in 2012.  This particular chassis was quite well used and had no body.  The front part of the chassis was cracked in a couple places, but I didn't care what kind of shape it was in as long as it could stay together and drive.  It came with the original wheels and tires in good condition, which was a nice bonus for the price paid.

After taking it all apart and cleaning everything, rebuilding it was fun.  I rebuilt this chassis as a Madcap because I wanted to see the Madcap body and wing styling, which seemed more appealing than the Saint Dragon body styling.  The leftover parts trees from the first Saint Dragon chassis I restored had the Madcap rear wing mount pieces I needed so I ordered a reproduction Madcap body and wing from Team Bluegroove in Canada.  I also purchased a steering rod that was missing.

The original red friction shocks were painted metallic red by the previous owner.


Since the plan was to use the vehicle as a runner, I upgraded the friction shocks to the Tamiya black CVA mini (50519) and short (50520) oil dampers.  


This is the finished chassis after rebuilding.  The wheels and tires are made by Carson in the UK and are nice for asphalt driving.


Notice the clipped front bumper.  I think the previous owner used larger diameter wheels and tires and needed to trim the bumper so the tires wouldn't rub on full steering lock.


For radio and electronic gear, I used a Futaba R113ip receiver with Novak 3 Amp BEC (#5460), Tamiya TEU-104BK ESC with an old Mabuchi RS540S motor, and an old Futaba S28 servo for steering.

Although the chassis tub itself was quite well used and cracked in spots, I decided not to replace it.  They are quite expensive anyway.  I used some CA glue to hold a cracked front post together.  I think Tamiya engineered the front posts too thin on this chassis.  Even on a new tub it is easy to split and crack the post as you screw in the top brace.

The CA glue is already cracking.  Maybe it's time to use epoxy instead.

The bottom front part of the tub is also cracked around the screw holes, but it should hold together as long as I don't jump it much.  I plan on driving it mostly on asphalt anyway.


The rear of the chassis tub is in good shape.


I left the drivetrain stock this time rather than upgrade to the Thorp 48P gear system like I did for the Saint Dragon.  This chassis didn't come with a motor or pinion, so I found an old Mabuchi RS540S and cleaned it up a little and then found a 23T pinion with the correct pitch in my pit box.  The motor brushes are very worn, but it still has a lot of life left.

Here is the Team Bluegroove body and wing after trimming and painting in box art colors.  I used Tamiya PS-2 Red (86002) on the wing and PS-5 Black (86005) plus PS-1 White (86001) on the body.


I was lucky to get my hands on a set of original Tamiya Madcap decals from TamiyaClub member 'toybaron'.  Thanks Ron!


And here the body and wing are resting on the chassis before applying the decals.  Note that the wing is just balanced on the wing mount, not screwed, so its positioning is slightly off. 


And finally, the finished vehicle with decals applied:


Getting all of the decals to line up on either side is difficult, so there are some slight alignment and spacing issues, but overall not too bad.  This is supposed to be a runner, after all, not a shelf queen.  I used soapy water to make it easier to position the decals.  Of the three tinted cockpit window decals, the top one was the most difficult to apply.  It is slightly wider than the top part of the window so the edges of the decal buckle due to the complex curve.  No amount of heat from a hair dryer or pressure from a toothpick or fingers could overcome the bubbling.  I may strategically cut the edges using an X-Acto knife to get the decal to lay down flat.  If I do nothing, the edges will fill with dust and dirt and make the decal ultimately fail.

I have to say that I love this chassis and the low profile body style of the Madcap.  Even though the front end chassis design is a bit weak because of those thin mounting posts I mentioned earlier, it's a fun car to drive and it handles fairly well.  This may seem a bit odd to say, but the sound of the motor and gearbox at full speed going up the driveway is really pleasant to listen to on this vehicle.  It just hums along like a fine-tuned machine - very different from some other vehicles in my fleet.

I really hope Tamiya re-releases the Madcap / Saint Dragon chassis in the near future.  The Astute was the higher-end racing version of this chassis and I hope Tamiya plans on re-releasing that as well.  These vehicles definitely deserve to be re-released.  "Never Give Up" hope!

Monday, January 16, 2012

Tamiya Saint Dragon Restoration (part 1)

I found this on eBay.   Here is how it looked when I got it and removed the wheels.

It is a Tamiya Saint Dragon (58083).  It has the same chassis as the Tamiya Madcap (58082) and shares a lot of components with the Nissan King Cab (58081) and Toyota HiLux (58086).  The chassis is actually based on the Tamiya Astute (58080), but much more low end.  Still, it has a good gearbox design and accepted many of the Astute hop-up parts, which we'll see later.  I do not believe it was a very popular model, as the body style was very polarizing.  The Madcap was much more popular here in the US since it was a traditional 2WD buggy.  Here is the box top picture from the original auction to show what I mean.  The body was based on a Japanese manga comic.


This was "new built" which means it was put together but never ran, according to the seller.  When I got it, it was obvious that it was never run, however the previous owner had made some major changes to the front suspension arms in order to fit some longer shocks.   They had also used some interesting parts to act as wheel bearings.  Basically, one front wheel had "bearings" made from a hex-shaped nut with no threads and the other front wheel had a Tamiya plastic bearing and a 5x10mm Kyosho bearing which was too small (Tamiya bearings are 5x11mm).  Quite odd.

The front shocks were sort of a hybrid between the stock friction bodies and longer shock shafts to reach out to the ends of the arms.  A hinge pin made out of another shock shaft was used on both front arms to mount the shocks and the hub carrier.

The front suspension arms were cut in order to make room for the longer shocks, which effectively ruined the arms and prevented their use in the restoration.

In the back, black oil shocks were mounted instead of the stock red friction shocks.
The wheels and tires are brand new.  Rear tires are still available from Tamiya, however the front tires are hard to find.  I am lucky to have these in perfect condition.

The ball diff was extremely tight and did not feel good at all.  After taking it apart and cleaning all of the parts, I discovered the cause of the tightness.

This ball race was deformed, probably from heat.  I'm not sure exactly how it happened since the car has never been run, but most likely someone held one rear wheel while the other spun under power from the motor, and the friction inside the ball diff melted the race.
I wasn't planning on using the stock gearing anyway, so I didn't care much about it.
The body is actually in good shape.  It is untrimmed, and has damage to some parts, but none of the damage is located on the body itself, just the pieces that will get cut off.  Very lucky!  The decals, however, were wrinkled, bent, punched-through, and not really in good enough shape to be useable, so I bought a new set.  I also bought a new set of front suspension arms, a rear shock X parts tree to replace some missing rear shock parts, the rod bag to replace some missing shock springs, the hinge pin bag to place missing shock shafts and the front outer hinge pins, some missing screws, and some hop-up parts.
Starting from the top and going clockwise, the Madcap motor plate (53060) will be used to replace the stock plastic motor plate (amazing that Tamiya designed a plastic motor plate - talk about cheap!), a Thorp King Cab/Astute 48P ball diff (4975), a Thorp 48P conversion kit for the King Cab/Astute (4980), and finally a set of Astute universal joints (53061).  There was nothing wrong with the stock gears or drivetrain components, but I wanted to make this a bit better than stock.
I also got a set of front (50519) and rear (50520) CVA oil shocks in order to provide better performance than the stock red friction shocks.

For the restoration, I'm going to completely disassemble this chassis down to the individual screws and parts, give everything a thorough cleaning, and then build from the manual like new, but using the hop-up parts shown above, plus full ball bearings, a Tamiya TEU-104BK electronic speed control, and an Epic Paradox 27T motor with a 19T 48P pinion.  For now, I'll use the stock red shocks in order to give it the box art look, and when I run it I'll switch over to the CVA oil shocks.
I am planning on painting this box art, so the body will be all white with the stock decals.  I may also get a reproduction Madcap body and wing in order to have an alternative body style, but I'm not really sure about that just yet.