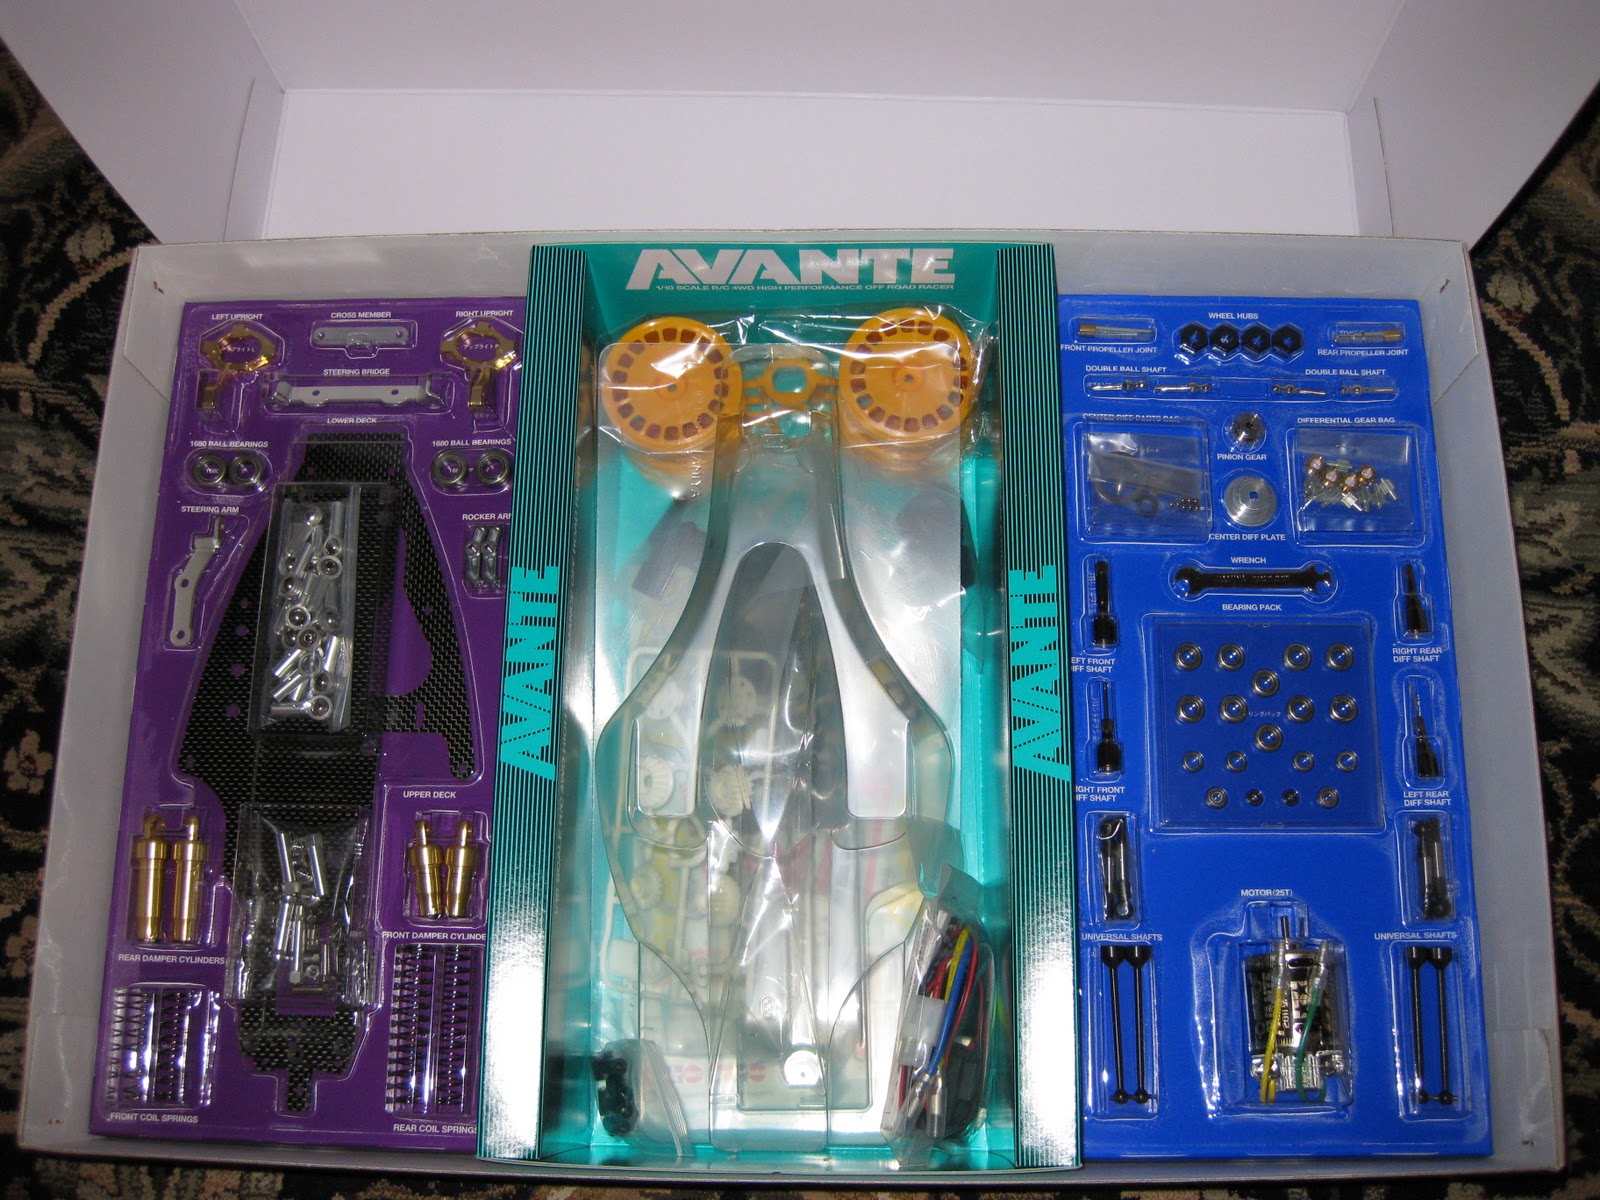
The Tamiya Avante Black Special (84270) was announced in late 2011 with kits available in early 2012. Because it has a part number that starts with 84xxx, it is a limited edition release. The kit is based on the Avante 2011 chassis and comes with special fluorescent pink wheels, stepped-spike tires (which are the same as the vintage Egress), a Black Special decal set for the body, and a Tamiya GT Tuned motor with a Black Special label. The first production run also includes an alternative set of bonus black wheels in the same design as the pink wheels. It is blister packed just like the Avante 2011 but has a very different box art design from the traditional style normally used on Tamiya RC kits. The Avante Black Special also comes with two hop-ups that do not come with the Avante 2011 kit: The carbon fiber steering set (84256) and the torque splitter set (84257).
Showing posts with label hop-up. Show all posts
Monday, March 12, 2012
Monday, January 30, 2012
Tamiya DB-01R
The Tamiya DB-01 chassis has been around for a few years and is a very good competitive off-road buggy platform from Tamiya. I do not race competitively, but I enjoy building Tamiya off-road kits, so with the imminent release of the DB-02 chassis in a few weeks the end of the DB-01 chassis production will come sooner or later. I decided to get a DB-01 chassis kit before they were discontinued and the price goes up. There are many kits based on the DB-01 platform, but I decided to stay in the middle of the price spectrum and get the DB-01R (84100) limited edition kit. I bought this kit for a really great price which was another deciding factor on which kit to buy.
The DB-01R is designed for competitive racing and includes many of the hop-up parts racers would end up buying in order to get better performance if they bought a lower-end kit like the Baldre or Durga.
When you open the box, you are greeted by... not a whole lot, actually. There are no fancy blister packs here, and in fact there are no cardboard dividers or mini cardboard boxes of parts, either. There is one large plastic bag that contains many smaller plastic bags full of parts, plus the molded plastic trees, the belts, and the main chassis.
Reviewing what is included in the box, here is the slipper clutch, some shock tops, bottoms and pistons, the main slipper spur gear, reinforced drive belts and hi-torque servo saver parts tree (same as 51000).
Looking at the rest of the kit contents, there are some more plastic parts trees individually wrapped in plastic bags.
The main chassis and suspension arms.
That's it for the main DB-01R kit. It may seem kind of cheap to not include basic things like the body, wheels, tires and motor, but you have to remember this is a true competition kit, designed for the racer that already knows what they want to use for their particular track situation and driving style.
Now for the additional parts and extras (hop-ups!).
Since a buggy is useless without wheels and tires, I bought some Tamiya branded ones (51320, 51321, 54185, 54186).
Reading
the various forums on the net, it was pretty clear that the
most-recommended body kit is the Baldre (51338). The body kit comes
with the main body, wing and decals.
Then, because I am never one to leave good enough alone, I got a bunch of spare parts and hop-ups. I bought a couple gear differential sets (54329) in case I want to swap the included ball diffs to see how it handles. I'll be using a Tamiya Super Stock TZ 23 turn motor (53696) plus Tamiya steel 48P pinion gears (54062, 53964, 53966). I'm not sure what size pinion to use, so I got a few sizes to try out. Then I got the aluminum steering components (54149, 53972), the anodized motor mount (54079), and the TRF501 stabilizer set (53963) for fun. Spare parts include a slipper pad set (54027), reinforced drive belt (54140), and an extra set of front and rear suspension arms (54140, 54141) not pictured.
I still have a few more hop-ups arriving, including a couple sets of Tamiya TRF501X differential joints (51286) and a package of Tamiya Ball Differential Protective Seals (53970). These were recommended because the stock diff joints are assembled metal and plastic two piece units that are prone to failure and the seals help keep dirt out of the ball diffs so they stay nice and smooth.
This will be a really fun build!
| The kit box is a bit smaller than the standard Tamiya kits |
| Yes, that is a carrying handle! |
The DB-01R is designed for competitive racing and includes many of the hop-up parts racers would end up buying in order to get better performance if they bought a lower-end kit like the Baldre or Durga.
Some of the chassis and suspension components are made out of a carbon fiber reinforced plastic instead of plain non-reinforced plastic or glass-filled plastic in order to make them stiffer. Upgraded shocks are included, as well as other anodized aluminum parts including suspension mounts and motor heat sink, plus front and rear universal shafts and a slipper clutch. The list of included hop-up parts is enough to tilt the scales and say that the DB-01R has the best bang for the buck overall when compared with the other DB-01 kits like the Baldre, Durga and limited edition TRF511. The Baldre and Durga are designed for sport-level racing and bashing around, while the TRF511 is for high-end competition, so the DB-01R sits right in the middle.
The DB-01 chassis is a mid-motor design with two equal-length belts driving the front and rear wheels. The slipper clutch with front and rear ball differentials work to transmit power to the ground. The gears are 48P to keep in line with the standard used by other manufacturers.
| The box isn't really that full |
The first thing that jumps out at you is the lack of a body, wing, wheels, tires, motor and pinion. That's right, all of those parts are not included in the DB-01R kit. Being for the racer, these components were left out on purpose since each person wants to use slightly different components.
Looking further into the large plastic bag of bags, we see some more miscellaneous parts in bag B, including some blue anodized suspension mounts and more. Parts bag C includes the anodized aluminum TRF damper shock bodies and other parts. A couple more small plastic parts trees are also shown here and round out the contents of the large plastic bag.
Looking at the rest of the kit contents, there are some more plastic parts trees individually wrapped in plastic bags.
The main chassis and suspension arms.
That's it for the main DB-01R kit. It may seem kind of cheap to not include basic things like the body, wheels, tires and motor, but you have to remember this is a true competition kit, designed for the racer that already knows what they want to use for their particular track situation and driving style.
Then, because I am never one to leave good enough alone, I got a bunch of spare parts and hop-ups. I bought a couple gear differential sets (54329) in case I want to swap the included ball diffs to see how it handles. I'll be using a Tamiya Super Stock TZ 23 turn motor (53696) plus Tamiya steel 48P pinion gears (54062, 53964, 53966). I'm not sure what size pinion to use, so I got a few sizes to try out. Then I got the aluminum steering components (54149, 53972), the anodized motor mount (54079), and the TRF501 stabilizer set (53963) for fun. Spare parts include a slipper pad set (54027), reinforced drive belt (54140), and an extra set of front and rear suspension arms (54140, 54141) not pictured.
I still have a few more hop-ups arriving, including a couple sets of Tamiya TRF501X differential joints (51286) and a package of Tamiya Ball Differential Protective Seals (53970). These were recommended because the stock diff joints are assembled metal and plastic two piece units that are prone to failure and the seals help keep dirt out of the ball diffs so they stay nice and smooth.
This will be a really fun build!
Monday, January 23, 2012
Tamiya Avante 2011
Tamiya re-released the Avante in 2011, once again surprising the Tamiya community. The Avante 2011 (58489) is a modernized version of the original Avante (58072). Major chassis components and design are the same as the original, but some parts were upgraded and strengthened. For example, the upper and lower chassis plates are made out of carbon fiber instead of fiberglass, and the front uprights are made from machined and anodized aluminum instead of cast metal. There are many other changes as well, including universal joints in front and rear, updated shock design and modernized wheel hubs.
An incredible car, and amazing that Tamiya re-released it!
| Box top |
| Inside the box, showing the manual |
| Blister packs and polycarbonate body |
| The specially-labeled 25 turn Avante 2011 GT Tuned motor |
| Under the blister packs |
| More box art diagrams |
| TEU-104BK ESC, plus hop-up parts from Pargu2000 and rc_loverr |
Yes, I could not help but buy some alloy hop-up parts for my Avante. These parts from Pargu2000 and rc_loverr on eBay replace the stock E1, E2, C1, C2, and C3 plastic parts with aluminum. Another eBay seller, cty300, sells alloy Avante parts as well, and they are a bit more detailed in design than the ones by Pargu2000. Pargu's are more "chunky" while cty's are "elegant".
| Bonus 2.2" wheels |
| The decals are not the same as the originals |
An incredible car, and amazing that Tamiya re-released it!
Labels:
58489,
avante,
hop-up,
kit,
original,
pargu2000,
rc_loverr,
re-release,
reproduction,
tamiya,
vintage
Saturday, November 19, 2011
Turbo Ultima steering bellcrank upgrade
After installing the Ultima RB5 front axles and carriers and replacing the tie rod ball ends, there was still a lot of steering play from the hubs all the way to the steering servo, a Futaba S132H. The original Turbo Ultima steering design was rather sloppy to begin with due to the use of bent wire and oversize holes in the steering bell crank assembly. Even when new I was not happy with the design of the bent steering rod that went from the servo horn to the bell crank, but it worked so I left it alone, even for the restoration in 2010. Well, no more. I wanted that steering slop eliminated as much as possible.
Earlier this year I was searching for vintage parts on the net and discovered that A&L parts were being produced again from the original designs. If you were into RC back in the late 80's and early 90's you'll recognize the A&L name. Well, Daryl Lane (the 'L' in A&L) is operating Factory Works (http://www.factoryworks.com) and also selling reproduction A&L parts at http://vintageteamaandl.com.
One of the parts A&L has re-released is the steering bell crank assembly for various vehicles including the Associated RC10, Kyosho Ultima, Kyosho Optima Mid, and more. According to the web site, the original plastic molds are the same, but the color of the plastic is now a darker yellow in order to differentiate from the original parts. I never owned the original parts, so I cannot say if this is true or not. The new parts are, at least to me, fairly bright yellow, so the originals must have been day-glow or something if they were even brighter.
I ordered part #2180 from A&L which is the Ultima bell crank assembly with ball bearings since I did not have any bearings of the correct size in my stock. I also ordered a Tamiya servo saver assembly from another online hobby shop because my Turbo Ultima never had one installed. Why Tamiya? Well, I didn't know of any part numbers for Kyosho servo savers and I knew the general design of the Tamiya was exactly what I wanted.
Here are the parts cards for the servo saver and ball ends:
Unfortunately I did not take a picture of the A&L steering bell crank kit in its packaging before I opened it and started assembly, but it was a simple plastic heat-sealed bag with no header card separated into three different compartments.
Installing the steering bell crank kit took a fair amount of time because I had four inter-related and connected things to consider:
- Which bell crank parts to use (it comes with a left and right so you can decide the best orientation for your particular vehicle).
- How to position the steering servo.
- Which parts of the servo saver I was going to use (it comes with a short and long servo horn).
- I had to design a new steering tie rod that goes between the servo saver horn and the new bell crank assembly. I wanted to use a Tecnacraft rod if possible.
I ultimately positioned the servo in the chassis so that the back of the servo was hitting the side wall of the aluminum frame, and flipped the servo mounts backwards so the holes at the bottom of the frame lined up with the servo mount holes and the servo mounting tabs. The servo output shaft is positioned toward the front of the vehicle in order to allow the use of the large servo saver horn supplied with the Tamiya servo saver kit (part Q 2). The large horn protrudes above the upper deck of the chassis, but the upper deck FRP plate has a factory cutout that allows complete freedom of movement for the horn. It works so well it's like it was designed that way.
I should mention that the only reason this mounting design works is because of the Futaba S132H's short body. A regular sized servo would not work as nicely. The angle of the steering rod to the bell crank would be even worse from the ideal 90 degrees than this. Secondly, I had to reduce the steering dual rates on the transmitter to somewhere around 67% in order to limit servo travel in both directions and prevent binding at the steering extremes where the cranks hit the frame. It can't steer any more than that, so maximum steering is achieved. I do not know if it is possible to use the shorter servo saver horn because the extra travel required by the horn and the fact that the steering tie rod is connected to the inside may cause binding when the servo pulls back because the tie rod ball end would hit the servo saver body itself.
I used one 10mm and one 15mm Kyosho ball end with a Tecnacraft tie rod to form the steering tie rod linkage. It just worked out that way due to the limited selection of tie rod lengths I had to choose from. The ball stud and nut came with the Tamiya servo saver assembly kit. The same style ball stud was used on the other end mounted to the bell crank but no nut was needed. I drilled the mounting hole a little wider in the bell crank before screwing in the ball stud because it seemed like it was designed for a 2.6mm screw, while the stud was 3mm and I didn't want the bell crank to split.
Two yellow combination mounting nut and bearing posts hold the steering assembly to the main chassis frame using long flat head screws pushed up from the bottom frame. The bell cranks, with bearings installed, fit over the mounting posts. White plastic nuts are used to hold the bell cranks in place so they don't "lift" up and off the posts during use.
The black fiberglass steering plate comes with the A&L steering bellcrank kit. Two screws and shims connect the steering plate to the bell cranks. No bearings or bushings are used for these pivot points, which is a little disappointing. I hope the screw threads don't chew through the steering plate over time.
Perhaps some structural rigidity is lost because the A&L bell crank mounting screws do not reach the top chassis plate. I think with some work the screws and bearing posts could be replaced with aluminum posts of the appropriate width and length. A stepped design to the post could be used to keep the bell cranks at the bottom where they belong. Then the original kit machine screws that held the original bell crank posts could hold the new posts in place, keeping the structural rigidity the same as the original design. If I had the resources, I'd try it, so for now it is just a dream.
I had to switch to shorter Tecnacraft steering tie rods again due to the change in geometry created by the new steering assembly.
So, after all of that, did it work? In a word, yes. The steering slop is completely gone. In fact there is now more play in the outer hinge pin/steering hub than in the whole steering system. The A&L steering bell crank kit is very highly recommended.
Subscribe to:
Posts (Atom)