Showing posts with label reproduction. Show all posts

Monday, June 15, 2015

Futaba 3UCP 3D printed battery cover

Last year I purchased a couple of Futaba 3UCP transmitters on eBay that were missing their battery covers.  Here are pictures of one of them, front and back.

Futaba 3UCP 3 channel 2 stick transmitter (front)

Futaba 3UCP 3 channel 2 stick transmitter (back)

Futaba 3UCP battery compartment

Both transmitters were in good condition with only minor blemishes from usage.  The single major problem with each of them was the missing battery cover.  Apparently, the original owner was using some sort of larger battery pack and misplaced the covers over the years of owning them.  The seller, who seemed to be a clearance house company, searched for them to no avail when asked about them.  Knowing the covers are practically impossible to find, and with no response from Futaba support, I bought the radios anyway at a reduced price due to the missing covers.  The hope was that I'd find some hole-in-the-wall place online or eBay auction with covers for sale at some point.  I knew this would be unlikely, but worst case, these units could be useful as spare parts for my somewhat large collection of 3UCP transmitters if anything ever went wrong with them.

Here is what the original battery cover looks like:

Original Futaba 3UCP battery cover (front)

Original Futaba 3UCP battery cover (back)


After studying the OEM cover in detail, I decided it might be worth trying to see if I could create a 3D model of the battery cover and have it printed in plastic by a company like Shapeways (http://www.shapeways.com).  Having practically no experience in 3D modeling and design, I asked people on the TamiyaClub forum what they use for design software.  One person suggested using Rhino, but the trial version lasts 90 days and the full version was US $1000.  Although I figured I could create the battery cover in under 90 days, I would ultimately be left with nothing to use after that point in case I wanted to create other things for printing and I really didn't want to spend any money if at all possible.  In the end, I used Blender (http://www.blender.org) because it was free and appeared to have a fairly large user base, including many helpful tutorials on Youtube. Blender also seemed to be fairly powerful with many features that could allow my 3D models to become more complex as my skills improved.

After 10 hours of measuring the original battery cover, reading and watching tutorials and playing around on my own, I finally had the first version of the cover ready.


I created an account on Shapeways, uploaded the model and ordered it in strong and flexible plastic dyed black.  After a week and a half, it was delivered to my door.


Incredibly, it fit into place and actually snapped shut with a very nice clicking sound much like the original part!  I had to file down the top two corners because I forgot to round them in the 3D model, but I was amazed that my very first try at 3D printing actually worked and was completely useable.  The printed cover certainly wasn't perfect - it had gaps around the edges and did not contour perfectly with the transmitter back cover, but with some tweaking I was sure I could make it look and function even better.  

For version 2, I added some rounding to the two corners that I had missed and widened it so the door wouldn't show such large gaps on the sides and top.  I also pulled the bottom rear curved part back a little bit to make it larger than a 90 degree angle in order to more closely mimic the original door contour.  I had missed these things during my initial measurements and modelling.  I uploaded version 2 to Shapeways, ordered it, and waited another couple of weeks.  Here is version 2:


The second version functioned better and looked much nicer than version 1 when installed. The width was now perfect and the overall fit was much tighter, but I still wanted to make a couple more minor tweaks to the door in order to get it to fit more closely like the original part.  I increased the size of the rear stubs so the rear part of the door wouldn't lift as much and show a gap, added material to the hook part of the front barb so the door wouldn't pull down as much and leave a gap and finally enlarged the "OPEN" text so the 3D printer could have an easier time with it.  Upload, order, wait.  Here is version 3:


The third version fit very well with the same pleasing "click", but the looks were not quite as "clean" as the second version.  By clean, I mean it didn't quite fit snug at the top and sides like version 2, which had practically no gaps.  I do not know why this happened, because I did not modify those dimensions in version 3.  Also, it looks like a different model or brand of 3D printer created version 3 because the plastic looks and feels slightly different.  This may explain why the fit isn't the same as version 2.

At this point I thought I was playing within the realm of the resolution of the 3D printers themselves, so further attempts at refining the door might result in something that no longer functionally fit depending on which 3D printer created the part.  I decided that version 3 would become the final product.  3D printing is very different from a mold where each part comes out exactly the same.  Some variation is to be expected each time an object is printed, though it is usually very minor.

I created a store on Shapeways and enabled the ability for others to purchase it for themselves.  If you have a Futaba 3UCP transmitter that is missing its battery cover, you can now order a 3D printed one on Shapeways by clicking here.  Please note that the 3UCP battery cover is unique to this model and does not fit any other Futaba transmitter.

Monday, January 23, 2012

Tamiya Avante 2011

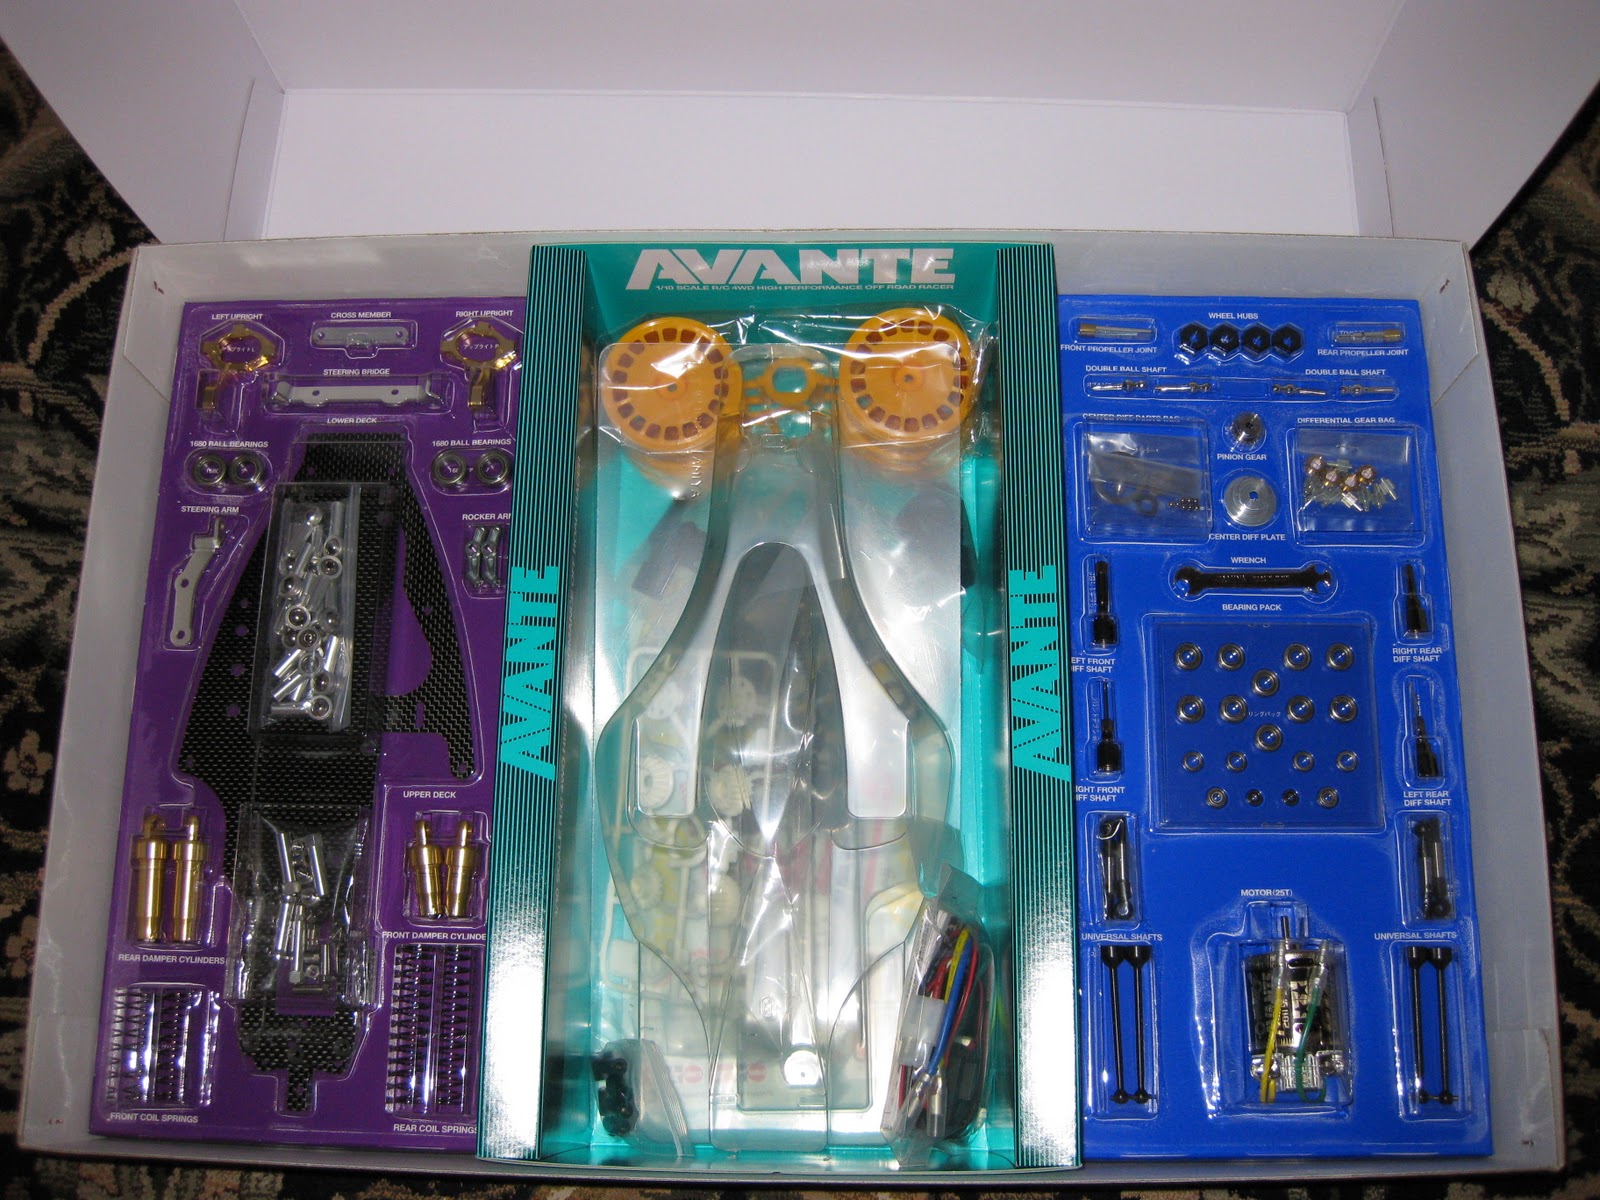
Tamiya re-released the Avante in 2011, once again surprising the Tamiya community.  The Avante 2011 (58489) is a modernized version of the original Avante (58072).  Major chassis components and design are the same as the original, but some parts were upgraded and strengthened.  For example, the upper and lower chassis plates are made out of carbon fiber instead of fiberglass, and the front uprights are made from machined and anodized aluminum instead of cast metal.  There are many other changes as well, including universal joints in front and rear, updated shock design and modernized wheel hubs.
Box top

Inside the box, showing the manual

Blister packs and polycarbonate body

The specially-labeled 25 turn Avante 2011 GT Tuned motor
Under the blister packs

More box art diagrams


TEU-104BK ESC, plus hop-up parts from Pargu2000 and rc_loverr
Yes, I could not help but buy some alloy hop-up parts for my Avante.  These parts from Pargu2000 and rc_loverr on eBay replace the stock E1, E2, C1, C2, and C3 plastic parts with aluminum.  Another eBay seller, cty300, sells alloy Avante parts as well, and they are a bit more detailed in design than the ones by Pargu2000.  Pargu's are more "chunky" while cty's are "elegant".

Bonus 2.2" wheels

The decals are not the same as the originals


An incredible car, and amazing that Tamiya re-released it!

Monday, December 19, 2011

Tamiya Buggy Champ and the Gold Edition

   Tamiya released the Buggy Champ in 2009 to much surprise and astonishment in the vintage RC community.  The Buggy Champ was actually the original Japanese name for the Tamiya "Rough Rider" released in the US in 1979.  The reasons for why the names were different in Japan and the US are not clear, although they could be simply because MRC, who was the US importer for Tamiya at the time, thought that the name "Buggy Champ" did not sound aggressive enough for the US market.  I have no facts to back that up, so it is just one possibility.   
   The original Rough Rider was the first of the Special Racing Buggy (SRB) models from Tamiya, which include the Sand Scorcher, Ford F-150 Ranger XLT and (some SRB purists would disagree with me on this) the Super Champ.  The SRB series was an effort by Tamiya to build radio controlled vehicles that were race-ready while still retaining many realistic features from the 1:1 scale vehicles they were based on.
   For the 2009 re-release, Tamiya kept the Buggy Champ name for the US market.  The reasons behind this choice are not clear either, but may have to do with trademarks on the Rough Rider moniker or because TamiyaUSA, now the sole importer of Tamiya products for the US, did not care how non-aggressive the Buggy Champ name was and decided that it was cheaper to use the same box art in all countries.  Again, I have no facts to back any of this up, so it is just an idea.  
   While not exactly the same as the original 58016 Rough Rider kit, the 58441 Buggy Champ is considered a "re-release" because it contains mostly the same parts and design elements that made the Rough Rider and the SRB platform such a vintage classic.  Tamiya even recreated the blister packaging that was so popular in the early eighties, which is really impressive to look at in person.  Many enthusiasts, me included, believed that Tamiya would never release such a kit again due to the sheer amount of metal parts and expense in manufacturing that goes with it.  As it turns out, Tamiya did not even have the original molds used for the major metal components for the chassis and had to create new ones based on an original example vehicle that Tamiya had in its possession.  The Tamiya engineer in charge of this effort claimed that it took only a couple of weeks of work to get the measurements required to make new molds.  I think that is impressive, and shows how much effort Tamiya is willing to expend in order to re-release kits.
   The Buggy Champ Gold Edition was a special edition of the Buggy Champ created by Great Planes Distributing and TamiyaUSA.  Great Planes is one of the largest radio control distributors in the US and is the place where almost all hobby shops and online stores get their Tamiya kits and parts.  Their marketing department wanted to create an exclusive edition of the Buggy Champ, so the Gold Edition was born.  The following pictures were taken by me shortly after receiving the Gold Edition of the Buggy Champ from Tower Hobbies.  I was one of the first to receive and post pictures of it on TamiyaClub using my Photobucket account.  Members of TamiyaClub were anxious to see what it was all about.  As it turned out, the only differences between the regular Buggy Champ and the Gold Edition were the painted body and stickers on the box.  The body was painted in Tamiya TS-84 Metallic Gold, but the roof section was not painted, probably because it was still attached to the parts tree and would have been difficult to paint quickly without getting paint on other parts that did not need to be gold in color.  Pricing on the Gold Edition was actually cheaper than the regular version, which was one of the reasons why I bought mine.  The gold can be sprayed over or left as is, so it does not detract from the regular kit at all in the grand scheme of things.
  

Special Gold Edition sticker distinguishes from the regular box

The blister packaging on the left and right sides display the major parts in a neat way


Same body as the regular kit, just painted in TS-83 metallic gold

The Tamiya TEU-104BK ESC was included

Since there was no official kit number for the gold edition, 58441 had to be covered by a sticker
The Buggy Champ Gold Edition is now discontinued by Tower Hobbies, and Tower no longer sells the regular edition either, however TamiyaUSA still has the regular kit in stock (at a premium distributor price so as to not compete with local hobby shops), so you could still have good luck finding a Buggy Champ at a local hobby shop.

Saturday, June 4, 2011

Reproduction Bruiser/Mountaineer Tires Part 2

I mounted the reproduction Bruiser tires on some RC4WD Classic Bruiser aluminum wheels that I had.  I think the combination looks great.  Check them out:


 The texture of the rubber is smooth and soft.  The foam inserts were used before mounting on the rims.

Monday, May 30, 2011

Reproduction Bruiser/Mountaineer tires

I recently bought some repro tires for my Mountaineer from eBay seller 'nowingu'. These tires are much softer than the original stock tires that came with the Bruiser and Mountaineer kits, but the tread design is very similar.  Many people complain that the stock tires these kits came with were too hard, so these repro tires are definitely worth a try.
Bruiser/Mountaineer repro tires by 'nowingu' on eBay

There is no sidewall lettering of any kind, so they are sort of plain looking, but the mold alignment and quality is very good.  The bead is uniform and the thickness of the rubber does not appear to vary much at all.  They do not 'wobble' or otherwise have any deformation issues that I've run into with tires made by RC4WD in the past.  However, I don't know how these will age over time, nor do I know how they will wear with use since I've yet to install them on my Mounty.  I am hopeful that they won't disintegrate too quickly (either by running or sitting on a shelf), but who knows.  The tires are sold in sets of 4 at the time of this writing.

The tires do not come with foam inserts so I spent a fair amount of time looking for some that would fit.  I believe foam inserts are a necessity for these tires due to their softness and the weight of the truck.  I finally found these:
JConcepts AND-1 Truck foam inserts (#3201)

The JConcepts AND-1 1/10th Truck Tire Inserts (part #3201) are a very good fit for the tires.  I chose the firm style because I felt that the tires needed the extra support.  While it could be possible to choose a slightly larger foam insert, I was unable to find anything that seemed close to the right size after I found these.  They fit inside the tire perfectly and the extra support they offer definitely improves the weight handling characteristics of the tires compared to no foam at all.  Note that you'll need to buy 2 sets of foams because they come in packs of 2.