Monday, December 2, 2013

Team Associated RC10 Classic (2013 re-release)

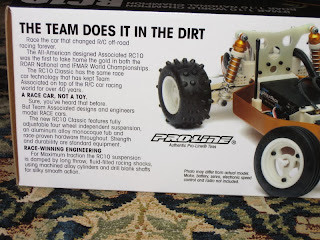
Team Associated has re-released the RC10.  The classic, original, gold anodized stamped aluminum tub with white plastic suspension arms and 6 gear transmission that changed the RC racing world forever in 1984.  Associated part number 6001.


It is now only two months after release and this limited-production kit is already sold out at many online retailers and is becoming harder to find at local hobby stores.  Actual production numbers were not disclosed, but some people think the total number of kits produced was around 2500.  Many people were surprised at how quickly the kits were bought up, and others were shocked and disappointed at how the allocation and distribution of the kits was handled.

The box presentation is similar to the original.  Associated used the same picture of the RC10 flying through the air off a dirt mound as the original box.  The parts are very similar to the original, too, but with some updates necessary for 2013, such as the ability to handle mild brushless motors and LiPo battery packs.  Other more subtle modifications were made to most parts in order to differentiate the re-release parts from original parts, which is a good thing for vintage collectors and restorers.


One thing to note here is that the re-release kit was not made in the USA like the original, at least not all of it.  Some parts were made in the US, such as the tires (by Proline) and gold anodized aluminum parts, but the rest of the parts were manufactured somewhere else, like China.  The actual kit boxing was done in China.


When the kit box is opened, you are greeted by a sight very similar to the original.  Many bags of parts.


Proline tires and three-piece wheels

The original kit included bushings and so does the re-release.  It is highly recommended to purchase ball bearings in order to reduce wear and friction.  You will need the following ball bearings:

Inner diameter Outer diameter Style Quantity
3/16" 5/16" flanged 9
3/16" 5/16" unflanged 2
3/8" 5/8" unflanged 2
1/4" 3/8" flanged 5

The original kit used a 32P spur gear, but the re-release uses a 48P spur.   The internal gears, however, are still 32P.   

The kit does not include a motor or 48P pinion gear.  The recommended pinion size is around 18 teeth when using a 27T stock brushed motor.  Associated does not recommend using a brushless motor less than 8.5 turns.

Six gear transmission, rear arms and battery holder

Shocks, spur cover, ball ends, steering parts and shock tower

Tie rods, gold aluminum nose and motor plate, front suspension parts

Gold anodized aluminum tub

Driver and rear wing

Body

A slip of paper like this one is included in each kit box.  Parts bags were checked off as each one was added to the box.  The online forums have already determined that the number at the bottom (2216) is not the kit number because many people have the same number.  It is likely to be the identification number of the person that performed the box contents inspection (quality assurance).

Quality control sheet

Decals, manual and antenna tube

Two different sets of decals are included. 

Decal sheets

The manual is similar to the original but has been updated for the re-release.

Assembly manual

There are some assembly issues to be aware of.  The RC10 experts at RC10Talk.com have compiled a list at this link:  http://www.rc10talk.com/viewtopic.php?f=88&t=33130
In addition to that excellent reference, there are many other threads discussing the re-released RC10, so feel free to check them out and post your own experiences and opinions.

As for spare parts, Team Associated has stated that there will be plenty of spares available for a long time, so there should not be any worries of not being able to get spares of broken or worn out parts.  


Due to the plethora of spare parts availability it is possible to "build your own kit", given that the re-release kit is now hard to find, however the cost of doing so would be much higher than the kit price of $250 US.
 

In addition to spare parts, Team Associated has released hop-up parts for the RC10 Classic, as it is called, including black anodized aluminum tub, motor mount and nose plate, bellcrank steering kit, and more.  There is speculation that a re-released stealth transmission will be available in the future.

As a long-time Tamiya fan who has thoroughly enjoyed the re-releases over these past few years, I am glad that Team Associated decided to re-release the RC10.  It is truly a classic racing vehicle that changed how future car designs would be made and it's nice to be able to build one from scratch.

Monday, October 28, 2013

Tamiya Neo Scorcher (TT-02B)

When Tamiya announced the Neo Scorcher (58568) in early 2013, I fell in love with the shape and styling of the body and the blue and white colors of the paint and decals.

Tamiya Neo Scorcher (Picture from TamiyaUSA. © Tamiya, Inc.)

I later learned (from Tamiya's own description) that the Neo Scorcher was inspired from the vintage Terra Scorcher (58075) and the decals were based on that kit's design.

The Neo Scorcher is based on the new TT-02 chassis platform from Tamiya, specifically the TT-02B (Buggy) variant.  The "B" version has longer suspension arms, long CVA dampers and larger bumpers than the TT-02, plus buggy-specific off road wheels and tires and a buggy body and wing to match.

The TT-02 chassis is designed for entry-level bashing and racing, not competition.  It has plastic, non-adjustable suspension links, plastic dogbones and drive hubs (with metal shafts molded into them), plastic (glass filled) diff gears, and a plastic center driveshaft to send power to the front wheels.  All of this plastic makes it sound "cheap", but honestly the quality and strength of the plastic is higher than you'd expect and the molding quality is excellent.  Sure, it's still a low-end chassis, but made to take abuse and keep going.  It also supports many hop-ups to increase performance.  All accounts so far from people that have built it say that it's a solid chassis, fun to build and drive, and it's tough.

The box does not have the traditional styling with the big size and large colorful artist's rendition of the vehicle on the cover like you might expect.  Instead, it's similar in design to the DF-03RA box.  The basic box styling is of a generic TT-02B chassis (no body shown anywhere) with a sticker on the box top displaying a photograph of the actual model contained inside.  This makes it easy for Tamiya to release another TT-02B-based buggy by simply swapping the picture and putting a different body/wing/decals/body instruction sheet in the box (more about that later).

The picture of the Neo Scorcher is actually a sticker applied to the box top.

One interesting thing about the Neo Scorcher is that it includes the Mabuchi RS-540 Torque Tuned motor instead of the regular silver can RS-540 (Mabuchi or Johnson).  This 25 turn motor gives 306 g-cm of torque @ 16000 rpm compared to the stock 27 turn RS-540 that gives around 200 g-cm of torque @ 15000 rpm.  That's 50% more torque and a slightly higher speed at the cost of higher current usage.  These days with high capacity NiMH and LiPo batteries, however, run time is almost never an issue any more.


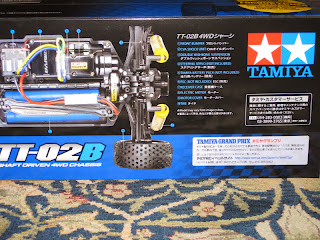
The TT-02 chassis is a shaft driven 4WD design.


Some of the hop-ups supported by the TT-02B chassis are shown on one of the side panels.


Opening the box reveals a standard assortment of parts bags, plastic trees, wheels and tires, plus the body and wing.


In the US, the kit includes a TEU-105BK electronic speed control (ESC).  The TEU-105BK replaces the TEU-104BK as the current model of speed control (as of Oct 2013) shipping with US Tamiya kits.  It adds a voltage regulation circuit (BEC) so power supplied to the receiver will not exceed 6V, which is a welcome feature that was missing from previous Tamiya ESC models (101BK and 104BK).  Unfortunately, Tamiya still refuses to acknowledge the existence and dominance of LiPo batteries by only including voltage cutoff for LiFe batteries in the 105BK.  The cutoff voltage of LiFe batteries is too low for 2 cell (7.4V) LiPo packs and they will be ruined if you attempt to use it.   You'll still need to purchase a separate LiPo voltage alarm if you intend to use LiPo packs with the TEU-105BK.


In the next picture, you'll see the separate instruction manual for the body.  Normally, Tamiya kits include the instructions for the body (trimming, painting, etc.) right in the chassis instruction manual.  However, the TT-02B series instruction manual is generic in nature when referring to the body, instead telling you to refer to the body-specific manual for details on how to finish the body and wing.


The instruction manual is generic for all TT-02B models.  No body-specific information is included because a separate body instruction manual is included with each kit instead.


For some reason this kit took a long time to become available to purchase in the US.  It was many months after release that I was finally able to get one.  Not sure what caused the delay, but I'm glad to finally have a kit in my hands.

Monday, September 2, 2013

Tamiya Novafox

Once again Tamiya has re-released another iconic buggy much to the delight of fans around the world.  This time The Fox from 1985 (58051) has been re-released as the Novafox (58577).  The name change was an annoyance for many enthusiasts of the original kit, however it is likely due to licensing issues surrounding the "Fox" name. 


The major components of the Novafox are the same as the original Fox with only minor differences and improvements.  The original's rear hex drives are now proper dogbones similar to what Tamiya has done with other re-releases which should make it more reliable.  There are some other minor gearbox changes to account for the modern parts used in the differential.  The front sway bar is now part of the stock kit rather than a hop-up option.  And obviously the decals were updated to use the new name and remove old sponsors.

Here are some box side shots:


The box lid upper left corner text:


Inside the box (finally!).  Unfortunately, no blister packs; just three large compartments.


The body and wing are made using the original 58051 mold from 1985.  US kits (and some other countries) come with a TEU-105BK electronic speed control.


Tamiya included ball bearings for the gearbox and rear axles however only plastic bushings are supplied for the front wheels.  It is recommended to replace the plastic bushings with four 5x11mm ball bearings.


The Novafox.  Another classic re-release by Tamiya.

Monday, August 5, 2013

Kyosho Raider Restoration (part 3)

On to the final part of this Kyosho Raider restoration: finishing the body, wing and wheels.

In the past I have generally used curved lexan scissors to trim polycarbonate bodies.

Duratrax lexan scissors

These scissors are specially designed to aid in trimming excess lexan due to the curved shape of the blades.  They work quite well for general trimming and going around outside corners, but I've found them hard to use around tight inside corners, especially if the lexan is thick and won't bend out of the way easily.

Another method modelers use to trim lexan is a technique called scoring.  Using a sharp knife, a score line is made along the body either right on or just outside the molded trim line.  The depth of the cut does not have to be very deep to be effective although deeper cuts do help in cases where the lexan is fairly thick.  Once the body has been scored, strategic cuts can be made using lexan scissors or the knife blade to allow the excess lexan to be bent and or ripped along the score line.  The resulting edge is quite clean, similar to how glass is scored and broken to create a clean edge.

I used the scoring technique on this Kyosho Raider reproduction body and wing from Team Bluegroove due to the many curves and thickness of the lexan.  Using a brand new X-Acto #11 blade, I scored a trace line on the outside of the body, cutting through the protective blue plastic layer and into the body.  The key is to make a continuous score line so the plastic can be bent and ripped apart cleanly.  When separating the trimmings from the body it helps to go slowly in case the lexan doesn't want to follow the score line as it is ripped apart.  A body can be ruined very quickly if the lexan rips into the wrong location.  The knife can be used to help cut in places where it looks like the score isn't deep enough.

Once the excess parts were trimmed and the body was separated from the wing, I used sandpaper and a small set of flat files of various shapes to fine-tune and smooth the edges.  

Needle file set and 100 grit sandpaper

I also made sure to round all corners to varying degrees to remove the sharp edges using mostly rough sandpaper.  I haven't found a need to use finer sandpaper because the edge is smooth enough already.  Finally, I test-fit the body to the chassis and marked the placement of the holes for the body mounts, antenna, and wing.  Using a body reamer tool, I made holes in the marked locations, taking care to not make them too large.  On this body, the rear body mount hole is actually rectangular, so the X-Acto knife and flat files were used to shape the hole into the final size.

Kyosho body reamer

The trimmed body and wing before final washing, masking and painting:


Since this is a reproduction body, the dimensions are not always exactly the same as the original.  Most people would agree that while Team Bluegroove bodies are decent quality, they do not always match the fine detail and dimensions of the original.  In the case of this Raider body, I think the length is slightly shorter than the original Kyosho.  Due to this, I had to put the rear body mount hole further back than depicted in the Raider manual.  

The rear body mount hole is supposed to be on the rear part of the roof

Here is the body mounted on the chassis:


As you can see below, the rear body mount hole is right in the middle of the near vertical area where the rear roof drops and goes to the rear deck of the body between the shock tower posts.  This hole location seemed to be the best way to balance the position of the front of the body with the shocks and steering linkage with the rear shock mounts and rear body overhang.  The body slightly overhangs the rear gear case which looks great. Thankfully the top hole of the rear body mount is high enough so a body pin just clears the roof deck and keeps the body secured.

Rear body mount hole is rearward of the location depicted in the manual

The front body overhang is almost in line with the front of the suspension arms which I also think is aesthetically pleasing.

Front body mount hole is close to the default location

Given the center line locations of the front and rear body mount holes, the body isn't very stable side-to-side.  If the rear body hole was in the correct roof location as shown in the manual, I think the body would have been stabilized by resting the shock tower recesses molded into the body on top the rear shock tower.  I can still use the shock tower recesses to stabilize the body by using screws set to the proper depth in the top of the shock tower.

I used Tamiya PS-2 Red (86002) backed by PS-1 White (86001) for a box art look.  Perhaps I should have used silver or black as a backing color to darken the red some more.  The camera makes it look more neon than it actually is.


Applying the decals is fairly simple to do.  I use a small tub of water with a few drops of dishwashing soap mixed in to help apply the decals.  After cutting the decal, I dip it into the soapy water and then apply it to the body.  The soap allows the decal to slide on the body before the glue grabs.  This allows for fine-tuning the placement of the decal on the body but doesn't affect the glue from sticking once the final position has been found.  Any water under the decal is pressed out from the middle of the decal to the edge to prevent bubbles.  For bends and corners, a hair dryer on medium heat helps soften the decal slightly and activates the glue which prevents the decal from lifting.  Just press the decal into place while applying heat making sure not to get the decal or body too hot in the process.  Your fingers will be burned before damage is done to the decal in most cases anyway.

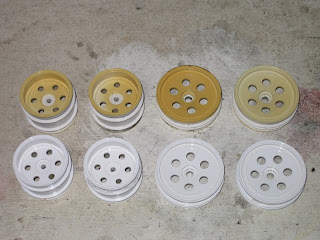
Remember the yellowed wheels?


I decided to use paint instead of chemically whitening them using hydrogen peroxide and sunlight because it seemed safer and potentially longer-lasting.  I used Tamiya TS-26 Pure White.  In the above picture, the four bottom wheels started out approximately the same color as the right-most wheel in the top row.

Here are the painted wheels with tires mounted and white lettering applied using a method that I previously posted about before:


Here are some pictures of the finished Raider:


The red color appears a bit "bright" in these photos, but in reality it isn't quite as intense.  One thing to note about the decals is that Kyosho did not specify where all of the decals should be applied in the manual, unlike Tamiya.  The major white decals were given specific locations, but the rest, such as the smaller manufacturer logos, were not specified.  I referred the to manual cover picture and box top for suggestions, but ultimately relocated some to other places according to my own personal taste.  I also omitted a few decals entirely because I thought it would become "too busy" and overwhelming.

Even though it was a fairly simple beginner's car, the Raider was a very popular basher in the late 80's and early 90's, thus making it definitely worthy of a restoration like this.